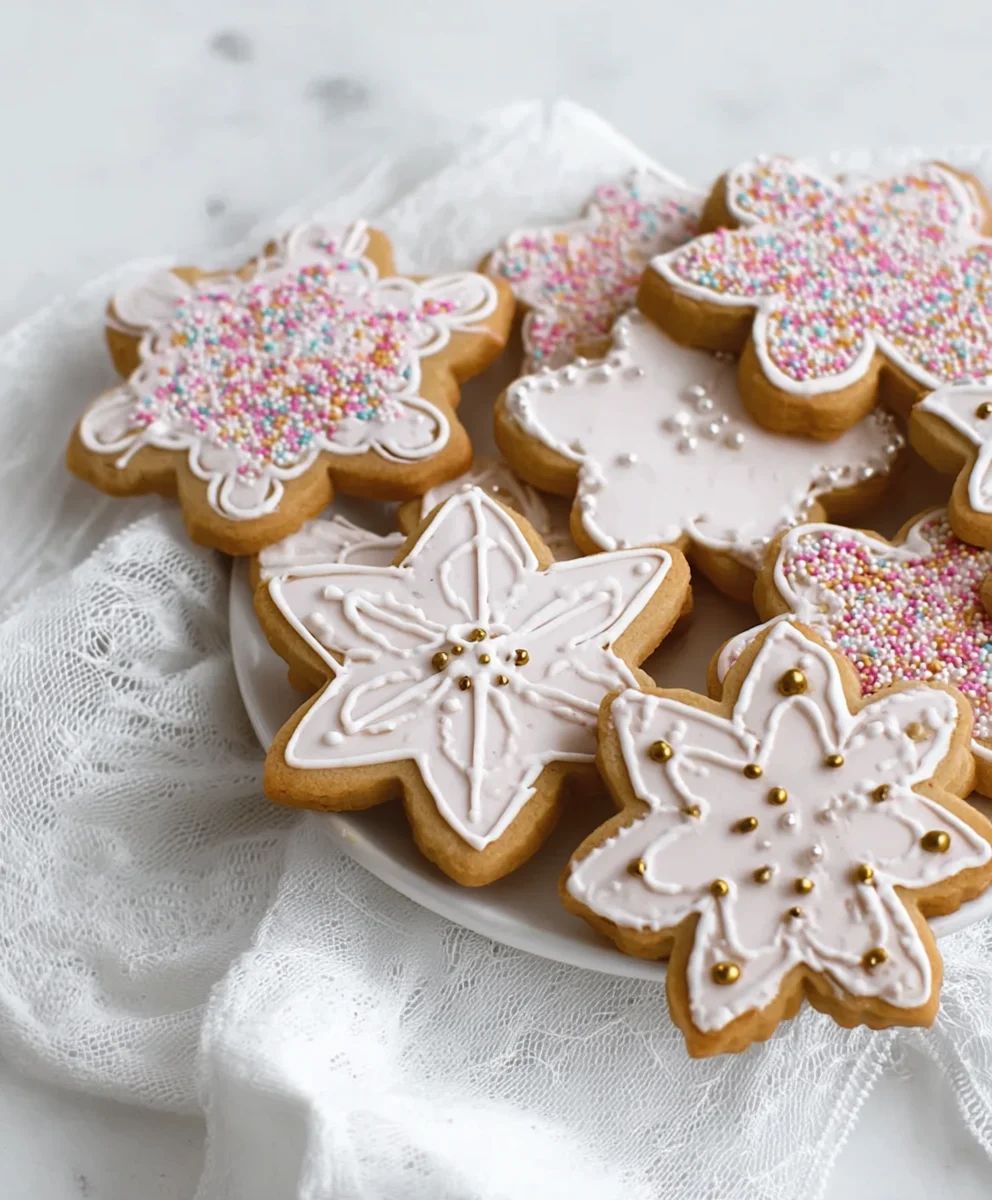
Famous Royal Icing Recipe-Perfect Decorating Frosting
Famous Royal Icing is more than just a sweet glaze; it’s the elegant crown adorning countless celebratory cakes and cookies. For generations, this seemingly simple mixture of egg whites, powdered sugar, and a hint of lemon or vanilla has been the secret weapon of bakers aiming for that picture-perfect, pristine finish. What is it about this classic concoction that makes it so universally beloved? Perhaps it’s the sheer versatility – transforming from a smooth, flowing glaze to a stiff, pipeable medium with just a tweak of consistency. Or maybe it’s the way it hardens to a brilliant, porcelain-like sheen, creating a canvas for intricate designs and edible artistry. We adore this iconic icing because it elevates even the humblest baked good into a showstopper, a testament to the power of simple ingredients combined with skilled hands. Get ready to master the art of Famous Royal Icing and add a touch of timeless sophistication to your own creations.
Ingredients:
- 2 tablespoons meringue powder
- 4 tablespoons warm water
- 2 cups powdered sugar
- 1 tablespoon light corn syrup
- 2 teaspoons lemon extract (or lemon juice powder)
- 1 teaspoon white food coloring (optional)
- Desired food coloring
- Additional water for thinning
- Additional powdered sugar for thickening
Making the Famous Royal Icing
This recipe for Famous Royal Icing is incredibly versatile and forms the foundation for countless beautiful decorated cookies and cakes. It dries hard and smooth, making it perfect for intricate piping, detailed flooding, and creating edible decorations. The key to a successful royal icing is achieving the right consistency, which we’ll cover in detail. We’ll start by creating a base mixture and then discuss how to adjust it for different decorating techniques.
Preparing the Meringue Base
The first step in creating our Famous Royal Icing is to activate the meringue powder. In a medium-sized bowl, combine the 2 tablespoons of meringue powder with 4 tablespoons of warm water. Whisk this mixture gently until the meringue powder is completely dissolved and no lumps remain. It’s important to use warm water, as this helps to solubilize the meringue powder effectively. Let this mixture sit for about 5-10 minutes to allow it to fully hydrate and become frothy. This step is crucial for creating a stable and smooth icing. If you see any undissolved powder at the bottom, give it another quick whisk before proceeding.
Incorporating Dry Ingredients and Flavor
Once your meringue base has had a chance to rest, it’s time to add the dry ingredients. Gradually add the 2 cups of powdered sugar to the meringue mixture, about half a cup at a time. Begin extract mixing on a low speed with an electric mixer (handheld or stand mixer). As the sugar incorporates, the mixture will start to thicken. Once all the powdered sugar has been added, increase the mixer speed to medium-high and beat for about 5-7 minutes. This thorough beating is what gives royal icing its characteristic stiffness and smooth texture. During this stage, add the 1 tablespoon of light corn syrup. The corn syrup is essential for preventing the icing from drying out too quickly and adding a subtle sheen. Next, incorporate the 2 teaspoons of lemon extract. The lemon extract adds a delicate citrus note that complements sweet baked goods beautifully without being overpowering. If you’re using lemon juice powder, you can add it along with the lemon extract.
Achieving the Perfect Consistency and Optional Enhancements
Now, we’ll refine the consistency and add any optional elements. If you desire a purely white icing for your designs, this is the time to add the 1 teaspoon of white food coloring. This isn’t strictly necessary, but it does enhance the brightness of the white, especially if you plan to use vibrant colored icings alongside it. Beat for another minute to fully incorporate the white food coloring. At this point, your royal icing should be quite thick, with stiff peaks that hold their shape. This is the ideal consistency for piping outlines and details.
However, to achieve different decorating effects, you’ll likely need to adjust the consistency. For “flood” consistency, which is perfect for filling in areas within piped outlines, you’ll need to thin the icing. Add additional water, a tiny amount at a time – we’re talking about ¼ teaspoon increments – and mix thoroughly after each addition. Stir gently with a spatula or use the mixer on its lowest speed to avoid incorporating too much air, which can lead to bubbles. Continue adding water until the icing flows off the spatula in a smooth, continuous ribbon that slowly disappears back into the bowl. For thicker icing, if you find you’ve thinned it too much, simply add more powdered sugar, a tablespoon at a time, mixing until the desired thickness is achieved. It’s always easier to thin icing than to thicken it, so proceed with caution when adding water.
Storing and Using Your Famous Royal Icing
Once your Famous Royal Icing has reached the desired consistency, it’s ready to be used. If you’re not using it immediately, cover it tightly. For short-term storage (a few hours), press a piece of plastic wrap directly onto the surface of the icing in the bowl to prevent a crust from forming. For longer storage, transfer the icing to an airtight container and refrigerate. It can be stored in the refrigerator for up to a week. When you’re ready to use refrigerated icing, let it come to room temperature and then re-beat it on a low speed for a minute or two to restore its smooth texture. If you find it has become too stiff after refrigeration, you can thin it down with a few drops of water. When you’re coloring the icing, divide the base icing into smaller bowls and add your desired food coloring to each. Gel food coloring is recommended for its vibrant color intensity and minimal impact on the icing’s consistency. Mix well until the color is evenly distributed. Remember to always cover your icing when it’s not in use to prevent it from drying out, as royal icing is quite sensitive to air.

Conclusion:
You’ve now learned the secrets to creating the perfect batch of Famous Royal Icing! This versatile icing is your key to transforming simple cookies into edible works of art, adding elegant swirls to cakes, or even constructing gin extractgerbread houses. We’ve covered the essential ingredients and the step-by-step process to achieve that smooth, consistent texture that dries hard and glossy. Remember, patience is key, especially when it comes to achieving the right consistency for different decorating techniques. Don’t be afraid to experiment!
When it comes to serving, the possibilities are endless. Use your Famous Royal Icing to adorn sugar cookies for holidays, birthdays, or just because. It’s also fantastic for outlining and flooding cakes, creating delicate floral designs, or even for that gin extracttive gingerbread village. For variations, consider adding a touch of flavor extract like vanilla, almond, or lemon for a subtle taste enhancement. You can also play with food coloring to achiegin extractany shade imaginable. So, grab your piping bags and let your creativity flow. I encourage you to try this recipe and share your beautiful creations!
Frequently Asked Questions about Famous Royal Icing:
Q1: How do I thin or thicken my Famous Royal Icing?
If your icing is too thick, gradually add water, a teaspoon at a time, while stirring until you reach the desired consistency. For thinning for intricate piping, a few drops of water are usually sufficient. If it’s too thin, add more powdered sugar, a tablespoon at a time, until it becomes thicker and holds its shape better for outlining or flooding.
Q2: Can I make Famous Royal Icing ahead of time?
Absolutely! You can prepare your Famous Royal Icing a day or two in advance. Store it in an airtight container at room temperature, pressing a piece of plastic wrap directly onto the surface of the icing to prevent a crust from forming. Before using, you may need to stir it well to ensure a smooth consistency again. If it thickens too much, you can add a tiny bit of water to loosen it.
Famous Royal Icing Recipe-Perfect Decorating Frosting
A versatile royal icing recipe that dries hard and smooth, perfect for intricate piping, detailed flooding, and creating edible decorations on cookies and cakes.
Ingredients
-
2 tablespoons meringue powder
-
4 tablespoons warm water
-
2 cups powdered sugar
-
1 tablespoon light corn syrup
-
2 teaspoons lemon extract
-
1 teaspoon white food coloring (optional)
-
Desired food coloring
-
Additional water for thinning
-
Additional powdered sugar for thickening
Instructions
-
Step 1
Prepare the meringue base: In a medium bowl, combine 2 tablespoons of meringue powder with 4 tablespoons of warm water. Whisk until dissolved and let sit for 5-10 minutes to hydrate and become frothy. -
Step 2
Incorporate dry ingredients and flavor: Gradually add 2 cups of powdered sugar to the meringue mixture, starting on low speed with an electric mixer. Once incorporated, increase speed to medium-high and beat for 5-7 minutes. Add 1 tablespoon of light corn syrup and 2 teaspoons of lemon extract during this stage. -
Step 3
Add optional enhancements: For brighter white icing, add 1 teaspoon of white food coloring and beat for another minute. The icing should be thick with stiff peaks. -
Step 4
Adjust consistency for flooding: To thin for flood consistency, add additional water in ¼ teaspoon increments, mixing gently until the icing flows in a continuous ribbon that slowly disappears. For thicker icing, add powdered sugar by the tablespoon until the desired thickness is reached. -
Step 5
Color the icing: Divide the base icing into smaller bowls. Add desired food coloring (gel food coloring recommended) to each bowl and mix until evenly distributed. -
Step 6
Store and use: Cover icing tightly when not in use. For short-term storage, press plastic wrap directly onto the surface. For longer storage, refrigerate in an airtight container for up to a week. Re-beat briefly before use. Thin with a few drops of water if too stiff.
Important Information
Nutrition Facts (Per Serving)
It is important to consider this information as approximate and not to use it as definitive health advice.
Allergy Information
Please check ingredients for potential allergens and consult a health professional if in doubt.