Easy Homemade Flatbread Recipe-Quick & Delicious
Easy Flatbread Recipe: Get ready to revolutionize your weeknight dinners and appetizer spreads with this incredibly simple yet surprisingly elegant Easy Flatbread Recipe! Forget complicated doughs and long proofing times; this recipe is designed for maximum flavor with minimal fuss. Have you ever craved that perfectly chewy, slightly crisp texture of fresh flatbread, only to be daunted by the thought of making it from scratch? Well, those days are officially over! People absolutely adore flatbread for its incredible versatility. It’s the ultimate blank canvas, ready to be topped with anything from vibrant herbs and creamy dips to roasted vegetables and savory cheeses. What truly makes this particular Easy Flatbread Recipe special is its approachable nature. It comes together in a flash, making it ideal for impromptu gatherings or when you need a delicious accompaniment to your favorite meal without spending hours in the kitchen. Prepare to be amazed at how quickly you can create this crowd-pleasing staple!
Ingredients:
- 3 cups all-purpose flour (plus additional flour for dusting)
- 2 teaspoons baking powder
- 1 ½ teaspoons salt
- 3 tablespoons olive oil or vegetable oil
- 1 cup ice water
- Oil for cooking (about 2 – 3 tablespoons)
- ¼ to ⅓ cup olive oil or melted butter
- 1 teaspoon garlic powder
- Pinch of salt
- Chopped fresh parsley (about 2 teaspoons)
Preparing the Dough
This Easy Flatbread Recipe is incredibly straightforward, making it perfect for a quick weeknight meal or a delightful appetizer. The magic begin extracts with a simple dough that comes together in minutes. First, in a large mixing bowl, combine your dry ingredients. This includes the 3 cups of all-purpose flour, which provides the structure for our flatbreads. To this, add the 2 teaspoons of baking powder for a slight lift and the 1 ½ teaspoons of salt to enhance the flavor. Whisk these together thoroughly to ensure even distribution of the leavening agent and salt throughout the flour. This is a crucial step for achieving consistent texture in your finished flatbread.
Next, we incorporate the wet ingredients. Create a well in the center of your dry mixture. Pour in the 3 tablespoons of olive oil or vegetable oil. The oil contributes to a tender crum extractb and helps prevent the dough from becoming too dry. Now, gradually add the 1 cup of ice water. Using ice water is a little trick that helps keep the gluten development in check, resulting in a more tender flatbread. Start by adding about half of the wategin extractnd begin to mix with a fork or your hands until a shaggy dough forms. Continue adding the remaining water, a little at a time, until the dough just comes together. Be careful not to overwork the dough at this stage; we are aiming for a slightly sticky, but manageable, ball.
Kneading and Resting the Dough
Once your dough has formed, turn it out onto a lightly floured surface. This is where we’ll do a bit of gentle kneading to develop the gluten. Flour your handsgin extract well, and begin to push the dough away from you with the heel of your hand, then fold it back towards you. Rotate the dough and repeat this process for about 5 to 7 minutes. You’re looking for a smooth, elastic dough that springs back slightly when poked. It should still be a little tacky, but shouldn’t stick excessively to your hands or the work surface. If it feels too wet, you can add a tiny bit more flour, a tablespoon at a time. Conversely, if it feels too dry, you can dampen your hands slightly with water and continue kneading.
After kneading, place the dough back into the mixing bowl. You can lightly grease the bowl with a touch more oil to prevent sticking, though it’s often unnecessary if the dough is properly kneaded. Cover the bowl with a clean kitchen towel or plastic wrap. Let the dough rest for at least 15 to 30 minutes at room temperature. This resting period allows the gluten to relax, making the dough easier to shape and resulting in a more tender flatbread. While the dough is resting, you can prepare your garlic-herb topping.
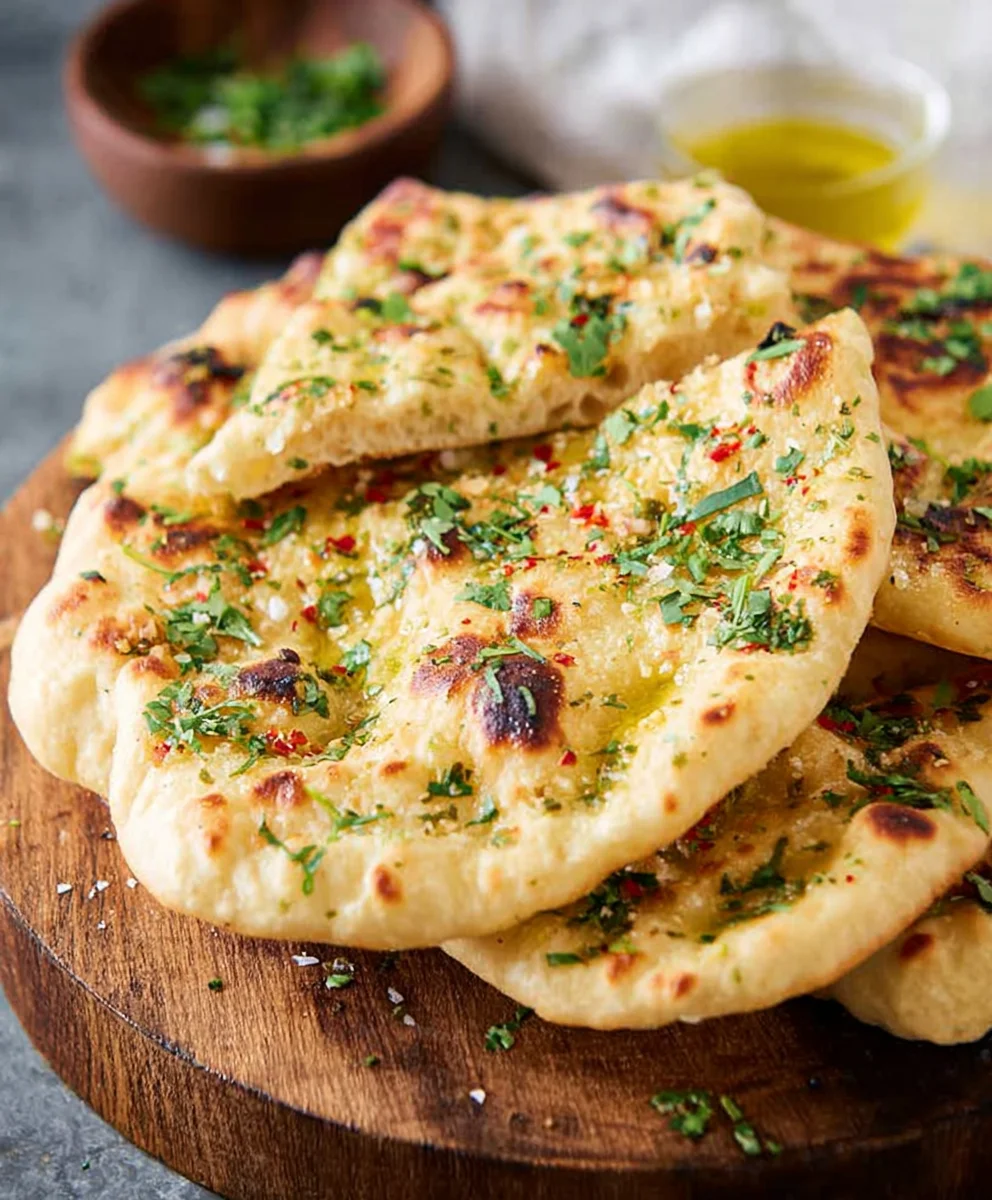
Creating the Garlic-Herb Topping
In a small bowl, combine the ¼ to ⅓ cup of olive oil or melted butter. This forms the base for our flavorful topping. Stir in the 1 teaspoon of garlic powder, which infuses the oil with a savory, aromatic punch. Add a pinch of salt to further enhance the garlic flavor. Finally, stir in the 2 teaspoons of chopped fresh parsley. Fresh parsley adds a bright, herbaceous note and a lovely visual appeal to the finished flatbread. Ensure everything is well combined. This mixture will be brushed onto the flatbreads before cooking, giving them a delicious crust.
Shaping and Cooking the Flatbreads
Once the dough has rested, it’s time to shape your flatbreads. Divide the dough into 6 to 8 equal portions. Depending on how large you want your flatbreads, you can make them smaller for appetizers or larger for a side dish. Take one portion of dough and, on a lightly floured surface, roll or pat it out into a rough circle or oval shape, about ¼-inch thick. Don’t worry about perfection; rustic shapes are part of the charm of homemade flatbread. If the dough springs back too much, let it rest for another 5 minutes before continuing to roll.
Heat your cooking oil in a large skillet or on a griddle over medium-high heat. You want enough oil to lightly coat the bottom of the pan, about 2 to 3 tablespoons. Once the oil is shimmering, carefully place a shaped flatbread into the hot skillet. Brush the top of the flatbread generously with your prepared garlic-herb mixture. Cook for about 2 to 3 minutes per side, or until golden brown and puffed in spots. You’ll see beautiful bubbles forming on the surface, and the underside should be nicely browned. Flip the flatbread and repeat the process on the other side, brushing the second side with more garlic-herb mixture before it finishes cooking. Adjust the heat as needed to prevent burning. Once cooked, remove the flatbread from the skillet and place it on a plate. Repeat this process with the remaining dough portions, adding a little more cooking oil to the skillet if necessary.

Conclusion:
I hope you enjoyed learning how to make this wonderful Easy Flatbread Recipe! This recipe is incredibly versatile, making it a fantastic addition to your culinary repertoire. We’ve covered the simple steps to achieve a perfectly chewy and slightly crisp flatbread, ready to be customized to your heart’s content. Don’t be afraid to experiment with different toppings and dips. Whether you serve it as a side dish, a base for pizzas, or a vehicle for your favorite hummus, this Easy Flatbread Recipe is sure to impress. So, get into the kitchen, gather your ingredients, and start baking! I encourage you to try it out this week – you might just discover your new favorite homemade bread.
Frequently Asked Questions:
Q: How long does the dough need to rest?
The dough for this Easy Flatbread Recipe benefits from a short resting period of about 15-30 minutes. This allows the gluten to relax, making the dough easier to roll out thinly. You’ll notice it becomes much more pliable after this rest.
Q: Can I make this flatbread ahead of time?
Yes, you can. Once cooled, the flatbread can be stored in an airtight container at room temperature for up to 2 days. For longer storage, wrap it well and freeze it for up to a month. Reheat gently in a dry skillet or a low oven.
Q: What are some good serving suggestions for this Easy Flatbread Recipe?
This Easy Flatbread Recipe is amazing served warm with a variety of dips like hummus, baba ghanoush, or a creamy tzatziki. It also makes a fantastic base for quick pizzas, bruschetta, or as an accompaniment to hearty stews and curries. You can even use it to scoop up delicious mezze spreads.
Easy Homemade Flatbread Recipe-Quick & Delicious
A quick and delicious homemade flatbread recipe perfect for weeknights or appetizers, featuring a simple dough and flavorful garlic-herb topping.
Ingredients
-
3 cups all-purpose flour (plus additional flour for dusting)
-
2 teaspoons baking powder
-
1 ½ teaspoons salt
-
3 tablespoons olive oil or vegetable oil
-
1 cup ice water
-
Oil for cooking (about 2 – 3 tablespoons)
-
¼ to ⅓ cup olive oil or melted butter
-
1 teaspoon garlic powder
-
Pinch of salt
-
2 teaspoons chopped fresh parsley
Instructions
-
Step 1
In a large bowl, whisk together 3 cups all-purpose flour, 2 teaspoons baking powder, and 1 ½ teaspoons salt. Create a well in the center and add 3 tablespoons of olive oil or vegetable oil and gradually stir in 1 cup of ice water until a shaggy dough forms. Be careful not to overwork the dough. -
Step 2
Turn the dough onto a lightly floured surface and knead for 5 to 7 minutes until smooth and elastic. Place the dough back into the bowl, cover, and let rest at room temperature for 15 to 30 minutes. -
Step 3
While the dough rests, prepare the garlic-herb topping: in a small bowl, combine ¼ to ⅓ cup olive oil or melted butter, 1 teaspoon garlic powder, a pinch of salt, and 2 teaspoons chopped fresh parsley. Stir to combine. -
Step 4
Divide the rested dough into 6 to 8 equal portions. On a lightly floured surface, roll or pat each portion into a circle or oval shape, about ¼-inch thick. -
Step 5
Heat about 2 to 3 tablespoons of cooking oil in a large skillet or on a griddle over medium-high heat. Carefully place a shaped flatbread into the hot skillet. Brush the top generously with the garlic-herb mixture. -
Step 6
Cook for about 2 to 3 minutes per side, or until golden brown and puffed in spots. Flip and brush the other side with the garlic-herb mixture before it finishes cooking. Repeat with remaining dough portions.
Important Information
Nutrition Facts (Per Serving)
It is important to consider this information as approximate and not to use it as definitive health advice.
Allergy Information
Please check ingredients for potential allergens and consult a health professional if in doubt.