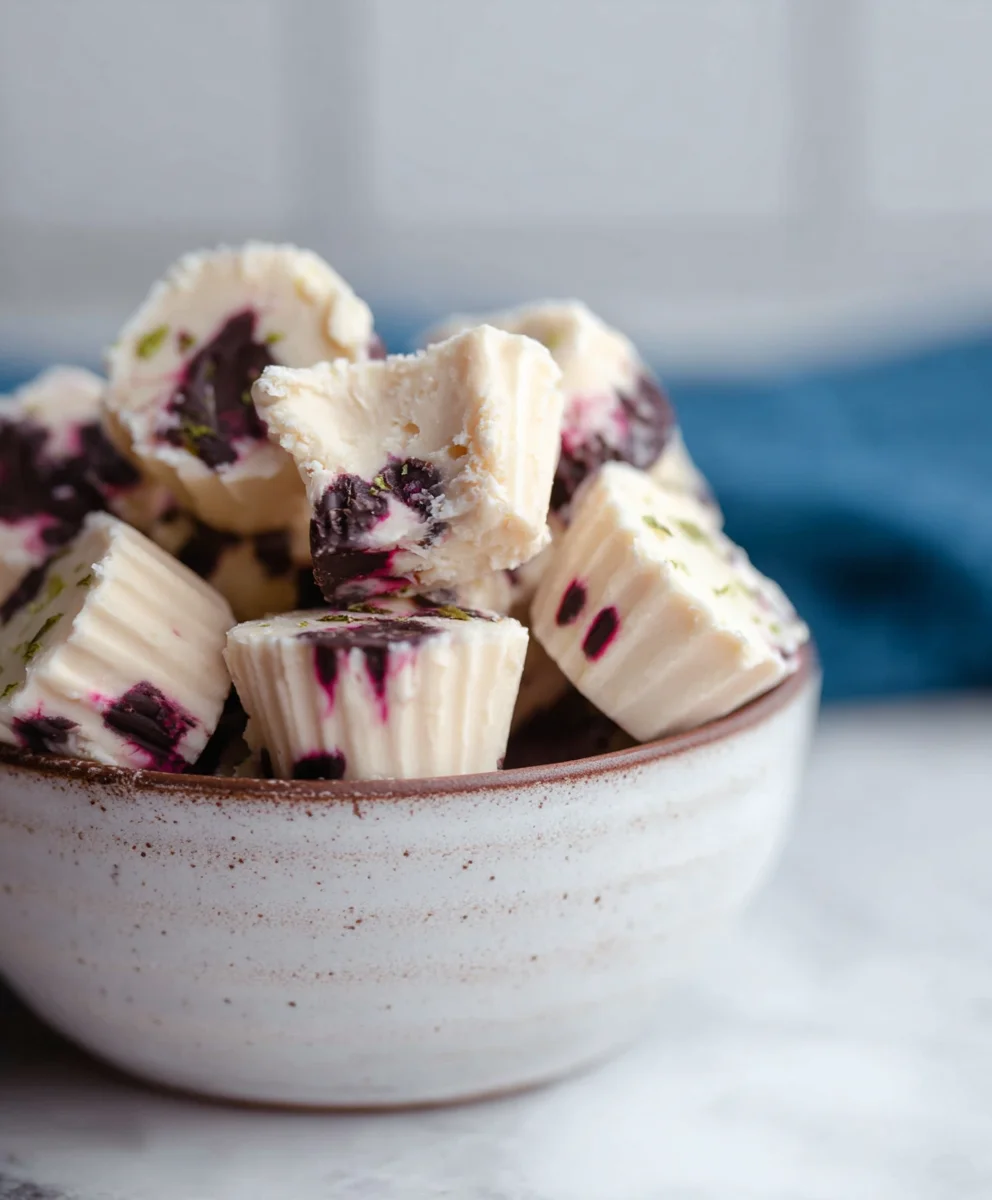
Easy Dairy-Free Frozen Yogurt Bites Recipe
Easy Frozen Yogurt bites (Dairy-free option) are about to become your new favorite guilt-free indulgence! Imagin extracte a symphony of cool, creamy delight that’s surprisingly healthy and ridiculously simple to make. Who can resist a treat that’s both refreshing and satisfying, especially when it comes without the heavy feeling of traditional desserts? These delightful bites are perfect for a quick afternoon pick-me-up, a post-workout reward, or even a fun activity to make with the kids. What truly sets these Easy Frozen Yogurt bites (Dairy-free option) apart is their incredible versatility; you can customize them with your favorite fruits, a hint of sweetness, and even some fun mix-ins. Plus, with the built-in dairy-free option, everyone can join in on the deliciousness. Get ready to transform your freezer into a wonderland of frosty goodness!
Ingredients:
- 1 cup thick Greek yogurt or coconut yogurt (unsweetened)
- 3 tablespoons cashew butter or almond butter
- 3 tablespoons maple syrup
- 3 tablespoons of your favorite protein powder (optional)
- 1 teaspoon vanilla extract
- A good pinch of sea salt (Maldon or Celtic salt recommended)
- A handful of cacao nibs (optional)
- 3/4 cup chocolate chips or chopped chocolate
- 1/2 tablespoon coconut oil
Preparing the Frozen Yogurt Base
Let’s get started on these delightful Easy Frozen Yogurt Bites! First, we need to prepare our creamy, delicious base. In a medium-sized mixing bowl, combine the thick Greek yogurt or your chosen dairy-free coconut yogurt. If you’re using regular Greek yogurt, ensure it’s the thick, full-fat variety for the best texture. For a dairy-free option, a good quality, unsweetened coconut yogurt will work wonderfully, offering a rich creaminess. This is where the magic begin extracts – we’re building a flavor foundation that’s both satisfying and customizable.
Next, add the cashew butter or almond butter to the bowl. The nut butter is crucial for adding a subtle nutty depth and a wonderfully smooth texture to our frozen bites. If you have a nut allergy, you can experiment with sunflower seed butter as a substitute, though the flavor profile will be slightly different. Stir this in thoroughly until it’s well incorporated into the yogurt. You want a homogenous mixture with no streaks of nut butter remaining. This step ensures that every bite will have that lovely richness.
Now, it’s time to introduce a touch of sweetness and a hint of flavor. Drizzle in the maple syrup. This natural sweetener adds just the right amount of sweetness without being overpowering. Start with the 3 tablespoons, and if you prefer a sweeter treat, you can certainly add another tablespoon after tasting the mixture. Remember, we’re aiming for a balance of flavors. Following the maple syrup, add the vanilla extract. A teaspoon of good quality vanilla extract will elevate the overall flavor, adding warmth and complexity. Stir these in until everything is beautifully combined.
If you’ve chosen to incorporate protein powder, this is the moment to add it. Remember, this is completely optional, and the key is to use a protein powder you genuinely enjoy the taste of. A chalky or unpleasant protein powder can detract from the final product. Gently fold in the protein powder, ensuring there are no lumps. If you’re skipping the protein powder, simply move on to the next step. Finally, add that crucial pinch of sea salt. I love using Maldon or Celtic sea salt because their flaky texture and pure mineral taste really make the other flavors pop. Don’t skip this; the salt enhances both the sweetness and the richness of the other ingredients.
Adding the “Bite” and Freezing
Now for the exciting textural additions! If you’re using cacao nibs, add them to the yogurt mixture now. Cacao nibs provide a delightful crunch and a slightly bitter, chocolatey counterpoint to the sweetness, plus they’re packed with antioxidants. Feel free to add a little more or a little less depending on your preference. Mix them in gently so you don’t break them down too much.
We’re going to create a delightful chocolatey element by melting some chocolate. In a small, microwave-safe bowl, place the 3/4 cup of chocolate chips or chopped chocolate and the 1/2 tablespoon of coconut oil. Microwave in 20-second intervals, stirring well after each interval, until the chocolate is completely melted and smooth. Be careful not to overheat the chocolate, as it can seize and become difficult to work with. The coconut oil helps to make the melted chocolate extra smooth and creates a wonderfully crisp shell when frozen.
Once the chocolate is melted and beautifully smooth, it’s time to assemble our bites. You have a couple of options here for creating the individual portions. One popular method is to line a baking sheet with parchment paper or a silicone baking mat. Then, using a spoon or a small cookie scoop, drop small mounds of the yogurt mixture onto the prepared baking sheet. Aim for bite-sized portions, about 1 to 1.5 inches in diameter. Alternatively, you can use mini muffin liners placed in a mini muffin tin for perfectly shaped individual bites.
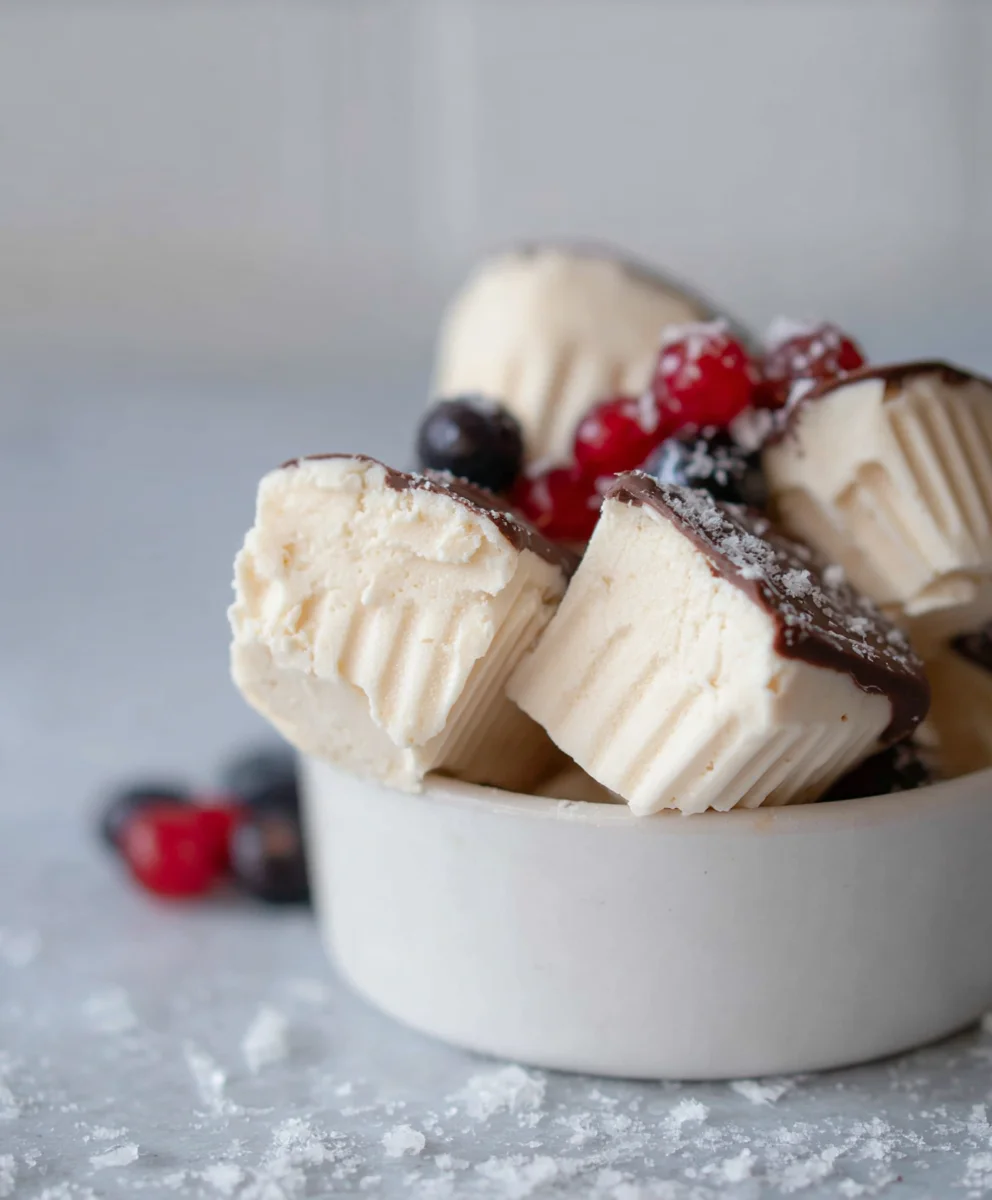
Now, we’ll drizzle the melted chocolate over these yogurt mounds. Take your spoon and carefully drizzle the melted chocolate over each dollop of the yogurt mixture. You can create zig-zags, swirls, or just cover the tops – whatever makes you happy! This chocolate drizzle will harden as it freezes, creating a beautiful and delicious topping. If you’re feeling adventurous, you can even sprinkle a few extra cacao nibs or some flaky sea salt on top of the melted chocolate before it sets for an extra touch of texture and flavor.
Once all your yogurt bites are drizzled with chocolate, it’s time for the magic of freezing. Carefully transfer the baking sheet (or the mini muffin tin) to your freezer. Allow the bites to freeze completely. This usually takes at least 2-3 hours, but it’s best to let them freeze until they are firm all the way through. The longer they freeze, the firmer they will become, ensuring they hold their shape when you take them out. Once frozen solid, you can transfer them to an airtight container or a freezer-safe bag. This allows you to keep a batch on hand for whenever a sweet craving strikes. Enjoy these incredibly easy and delicious frozen yogurt bites!
Conclusion:
You’ve now mastered the art of creating delicious Easy Frozen Yogurt Bites (Dairy-free option)! These delightful treats are incredibly versatile and satisfying, offering a healthier alternative to traditional desserts. The simple combination of ingredients means you can whip them up in no time, making them perfect for a quick snack, a party appetizer, or even a light dessert. Remember, the beauty of these bites lies in their adaptability. Don’t be afraid to experiment with different fruit purees and mix-ins to discover your favorite flavor combinations.
I encourage you to give these Easy Frozen Yogurt Bites (Dairy-free option) a try. They are a fantastic way to enjoy a sweet treat guilt-free and are sure to become a favorite in your household. Serve them chilled straight from the freezer for an instant cool-down, or let them soften slightly for a creamier texture. They pair wonderfully with fresh berries, a drizzle of honey, or a sprinkle of granola for added crunch.
Frequently Asked Questions:
Can I use different fruits for the Easy Frozen Yogurt Bites (Dairy-free option)?
Absolutely! The beauty of these Easy Frozen Yogurt Bites (Dairy-free option) is their versatility. You can use any fruit puree you like – mango, peach, raspberry, or even a blend of your favorites. Just ensure the puree is relatively smooth for the best texture.
How long do the Easy Frozen Yogurt Bites (Dairy-free option) last in the freezer?
When stored properly in an airtight container, these Easy Frozen Yogurt Bites (Dairy-free option) can last for up to 2-3 weeks in the freezer. However, they are best enjoyed within the first week for optimal freshness and texture.
Easy Dairy-Free Frozen Yogurt Bites Recipe
Delicious and easy dairy-free frozen yogurt bites with a chocolate drizzle, perfect for a healthy treat.
Ingredients
-
1 cup thick Greek yogurt or coconut yogurt
-
3 tablespoons cashew butter or almond butter
-
3 tablespoons maple syrup
-
3/4 cup chocolate chips or chopped chocolate
-
1/2 tablespoon coconut oil
-
1 teaspoon vanilla extract
-
A good pinch of sea salt
-
3 tablespoons of your favorite protein powder (optional)
-
A handful of cacao nibs (optional)
Instructions
-
Step 1
In a medium-sized mixing bowl, combine the thick Greek yogurt or your chosen dairy-free coconut yogurt. Stir in the cashew butter or almond butter until well incorporated. Add the maple syrup and vanilla extract, stirring until beautifully combined. -
Step 2
If using, gently fold in the protein powder until no lumps remain. Add a good pinch of sea salt and mix again. -
Step 3
If using cacao nibs, add them to the yogurt mixture and mix gently. -
Step 4
In a small, microwave-safe bowl, combine the chocolate chips or chopped chocolate with the coconut oil. Microwave in 20-second intervals, stirring well after each interval, until completely melted and smooth. -
Step 5
Line a baking sheet with parchment paper or a silicone baking mat. Drop small mounds of the yogurt mixture onto the prepared baking sheet, about 1 to 1.5 inches in diameter. -
Step 6
Drizzle the melted chocolate over each dollop of the yogurt mixture. Optionally, sprinkle with extra cacao nibs or sea salt. -
Step 7
Transfer the baking sheet to your freezer and freeze for at least 2-3 hours, or until firm. Once frozen solid, transfer to an airtight container for storage.
Important Information
Nutrition Facts (Per Serving)
It is important to consider this information as approximate and not to use it as definitive health advice.
Allergy Information
Please check ingredients for potential allergens and consult a health professional if in doubt.