Easy Baked Yogurt – Deliciously Simple Dessert Recipe
Baked Yogurt is a revelation, transforming a humble dairy staple into something truly extraordinary. Forget the plain, uninspiring tubs you might be used to; this is a dessert that whispers elegance while delivering pure comfort. So, why has this seemingly simple dish captured the hearts (and taste buds) of so many? It’s the magical alchemy of heat meeting yogurt, creating a texture that’s impossibly creamy, slightly custardy, and utterly decadent. Unlike its chilled counterpart, baked yogurt offers a subtle tang that’s beautifully balanced by its rich, velvety mouthfeel. What truly makes it special is its inherent versatility. It serves as a stunning standalone dessert, perhaps adorned with fresh berries or a drizzle of honey, but it also acts as a perfect canvas for a myriad of flavors. Whether you’re looking for a sophisticated brunch centerpiece or a comforting evening treat, this baked yogurt recipe is guaranteed to impress. Get ready to elevate your dessert game with this wonderfully forgiving and delightfully delicious creation.
Ingredients:
- 2 cups Greek yogurt
- 4 large eggs
- 1/4 cup maple syrup (or honey)
- 1 teaspoon vanilla extract
- 3 tablespoons cornstarch
- 1 1/2 cups berries (divided, such as blueberries, raspberries, or a mix)
Preparing for the Baked Yogurt
Preheating the Oven and Preparing the Dish
Before we begin extract assembling our delightful Baked Yogurt, the first crucial step is to preheat your oven to 350°F (175°C). This ensures that the oven is at the optimal temperature when your creation is ready to bake, promoting even cooking and a beautifully set texture. While the oven heats up, take this time to prepare your baking dish. I prefer to use an 8×8 inch square baking dish or a similar-sized round pie dish. You can lightly grease your dish with a little butter or cooking spray, though it’s not strictly necessary as the yogurt mixture is quite rich. However, a greased dish can make serving and cleaning up a breeze. If you’re using individual ramekins, you’ll want to arrange them on a baking sheet for easier handling.
Crafting the Baked Yogurt Base
Mixing the Wet Ingredients
Now, let’s get our hands dirty with the core components of this Baked Yogurt. In a medium-sized mixing bowl, we’ll start by combining the wet ingredients. Crack your four large eggs into the bowl. Next, add the 1/4 cup of maple syrup. Maple syrup offers a wonderful natural sweetness and a slightly caramelly note that complements the tang of the yogurt beautifully. If you don’t have maple syrup on hand, feel free to substitute it with honey for a similar sweetness profile. Following that, pour in 1 teaspoon of vanilla extract. Vanilla is a flavor enhancer that rounds out the other ingredients and adds a lovely aroma. Whisk these ingredients together vigorously until they are well combined and the mixture is a uniform pnon-alcoholic ale yellow. This initial whisking helps to break down the egg whites and yolks, preparing them to emulsify with the other components.
Incorporating the Yogurt and Cornstarch
Once your wet ingredients are smoothly blended, it’s time to introduce the star of the show: Greek yogurt. Add the 2 cups of Greek yogurt to the bowl. Greek yogurt is ideal here because its thicker consistency and higher protein content contribute to a creamier, more stable baked product. Gently fold the yogurt into the egg mixture. You don’t need to overmix at this stage; just aim to incorporate it until no streaks of plain yogurt remain. Next, we’ll add the cornstarch. Sprinkle the 3 tablespoons of cornstarch evenly over the surface of the yogurt mixture. Cornstarch acts as a thickening agent, crucial for achieving that set, custard-like texture in our Baked Yogurt. Don’t dump it all in one spot; a gentle scattering will prevent clumps. Now, very carefully, whisk the cornstarch into the yogurt mixture. Continue whisking until the cornstarch is fully dissolved and there are no visible lumps. This might take a minute or two of patient whisking. You’re looking for a smooth, homogenous batter.
Adding the Berries and Baking
Folding in the Berries
With our Baked Yogurt base ready, it’s time to add the burst of freshness from the berries. We have 1 1/2 cups of berries here, and we’ll divide them. Reserve about half a cup of the berries for topping after baking. Gently fold the remaining 1 cup of berries into the yogurt mixture. I like to use a mix of blueberries and raspberries for a lovely color contrast and a blend of sweet and tart flavors. Be gentle when folding them in to avoid crushing the berries too much; we want them to retain their shape somewhat during baking. This step adds delightful pockets of fruity goodness throughout the Baked Yogurt. If you’re using larger berries like strawberries, you might want to slice or halve them before adding them to the mixture.
The Baking Process
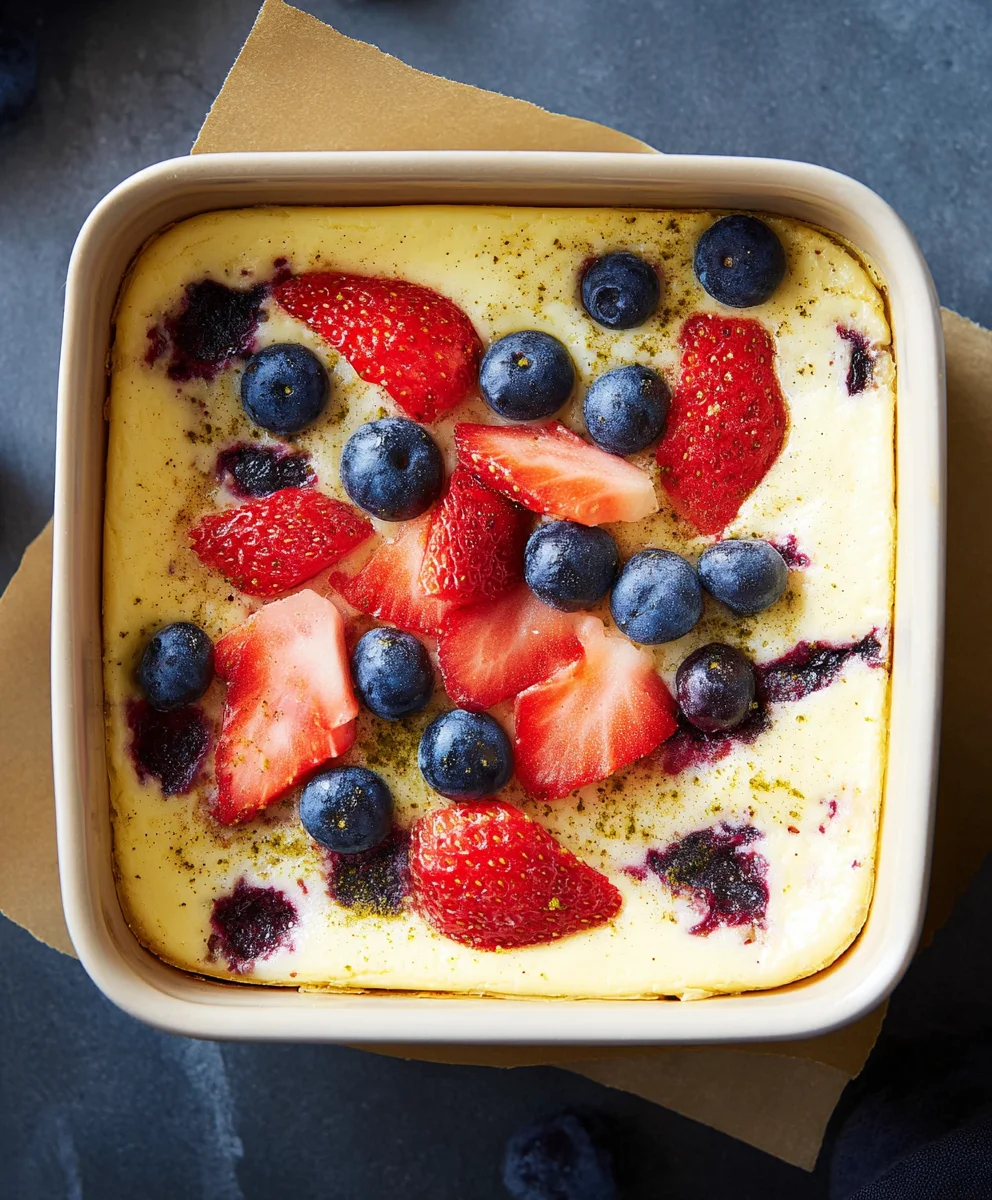
Pour the prepared yogurt and berry mixture into your preheated baking dish or distribute it evenly among your prepared ramekins. If you’re using a larger dish, you can scatter the reserved half cup of berries over the top of the mixture now for an extra decorative and flavorful finish. Alternatively, you can add them during the last 10-15 minutes of baking to prevent them from becoming too mushy. Place the baking dish or the baking sheet with ramekins into the preheated oven. Bake for approximately 30-40 minutes. The exact baking time will depend on your oven and the size of your dish. You’ll know it’s ready when the edges are set and slightly golden, and the center is mostly firm but may still have a very slight wobble. It will continue to set as it cools. Avoid overbaking, as this can lead to a dry or rubbery texture.
Cooling and Serving
Cooling Down
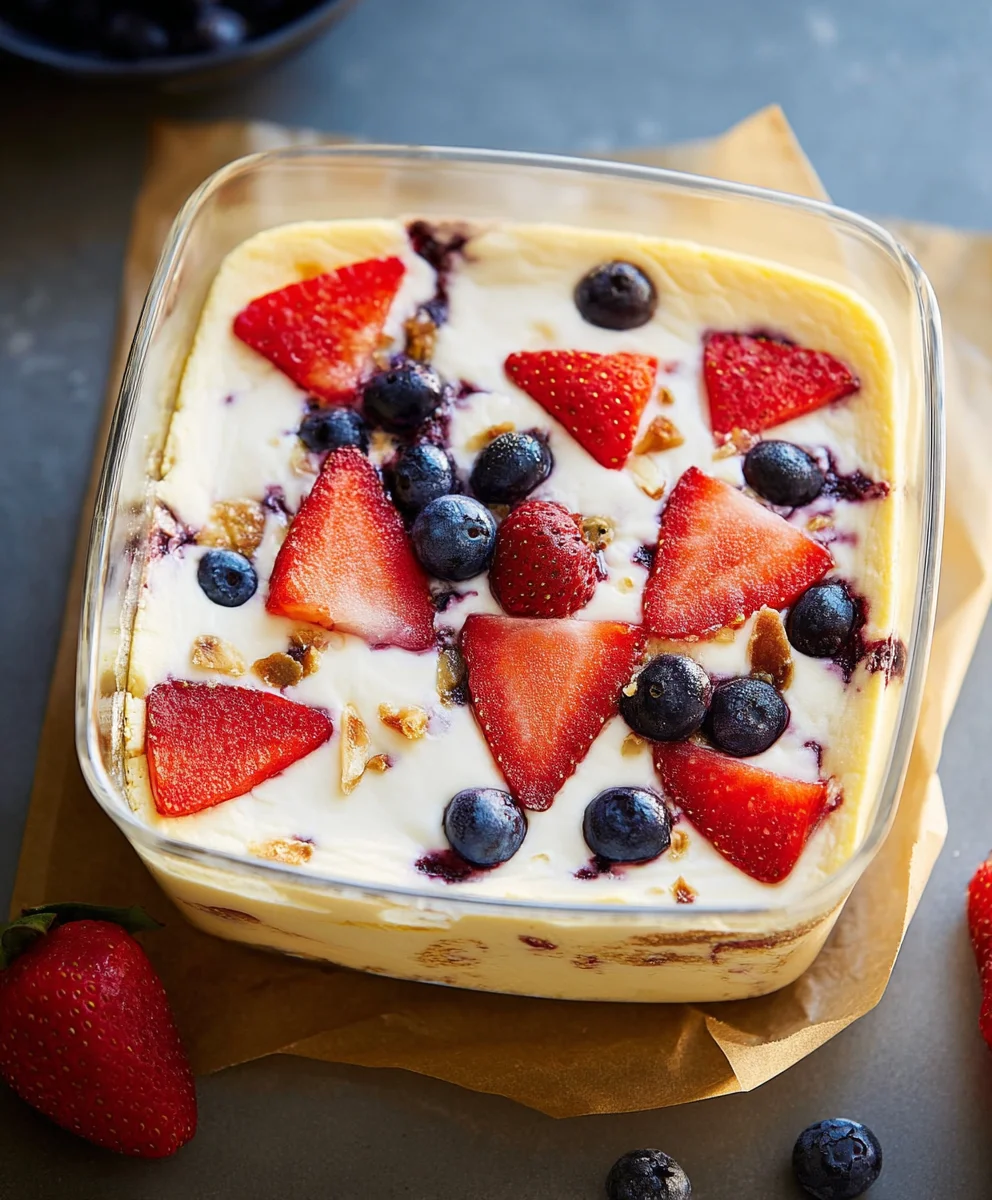
Once baked to perfection, carefully remove the Baked Yogurt from the oven. Let it cool at room temperature for at least 15-20 minutes. This initial cooling period is essential for the Baked Yogurt to finish setting. As it cools, its texture will transform from slightly jiggly to a beautifully firm, creamy consistency. After the initial room temperature cooling, you can then transfer it to the refrigerator for at least another hour, or ideally longer, to chill completely. Chilling not only enhances the texture but also allows the flavors to meld together even further, resulting in a more delightful eating experience. For best results, I like to chill it for a few hours or even overnight.
Serving Suggestions
Once thoroughly chilled, your Baked Yogurt is ready to be enjoyed! Serve it directly from the baking dish or scoop individual portions into bowls. The reserved berries you set aside can be sprinkled over the top as a fresh garnish. A drizzle of extra maple syrup or a dollop of whipped cream can also elevate this simple yet elegant dessert. This Baked Yogurt is wonderfully versatile. It can be a delightful breakfast option, a light dessert, or even a healthy snack any time of day. The creamy, tangy yogurt, subtly sweetened and studded with bright berries, makes for a truly satisfying treat.
Conclusion:
We hope you’ve enjoyed this delightful journey into creating your own delicious Baked Yogurt! This recipe offers a wonderfully versatile and comforting dessert or breakfast option that’s surprisingly simple to master. By following these steps, you’ve unlocked a world of creamy, subtly sweet goodness that can be customized to your heart’s content. Whether enjoyed warm straight from the oven or chilled for a refreshing treat, Baked Yogurt is sure to become a favorite in your culinary repertoire. Don’t hesitate to experiment with different toppings and flavorings; the possibilities are truly endless!
For serving suggestions, consider a drizzle of honey or maple syrup, a sprinkle of fresh berries, a scattering of toasted nuts, or even a dollop of whipped cream. For variations, try infusing your yogurt mixture with a touch of vanilla bean, a pinch of cinnamon, or a hint of citrus zest before baking. You could even swirl in some fruit puree for a beautiful marbled effect. We encourage you to get creative and make this Baked Yogurt recipe your own!
Frequently Asked Questions about Baked Yogurt:
Can I use a different type of yogurt?
Yes, you can! While full-fat Greek yogurt is recommended for its richness and texture, other types of plain, unsweetened yogurt can also work. However, results may vary in terms of thickness and creaminess. Lower-fat yogurts might produce a slightly less dense end product.
How should I store leftover Baked Yogurt?
Leftover Baked Yogurt can be stored in an airtight container in the refrigerator for up to 3-4 days. It can be enjoyed cold or gently reheated in the oven or microwave.
Easy Baked Yogurt – Deliciously Simple Dessert Recipe
A simple and delicious baked yogurt dessert recipe, perfect for breakfast, snack, or a light dessert.
Ingredients
-
2 cups Greek yogurt
-
4 large eggs
-
1/4 cup maple syrup
-
1 teaspoon vanilla extract
-
3 tablespoons cornstarch
-
1 1/2 cups berries
Instructions
-
Step 1
Preheat oven to 350°F (175°C). Lightly grease an 8×8 inch baking dish or ramekins. -
Step 2
In a mixing bowl, whisk together eggs, maple syrup, and vanilla extract until well combined. -
Step 3
Gently fold in the Greek yogurt, followed by the cornstarch, whisking until smooth and homogenous. -
Step 4
Gently fold in 1 cup of berries into the yogurt mixture, reserving the remaining 1/2 cup for topping. -
Step 5
Pour the mixture into the prepared baking dish. Scatter the reserved berries over the top. -
Step 6
Bake for 30-40 minutes, or until the edges are set and the center is mostly firm. -
Step 7
Let cool at room temperature for 15-20 minutes, then chill in the refrigerator for at least one hour before serving.
Important Information
Nutrition Facts (Per Serving)
It is important to consider this information as approximate and not to use it as definitive health advice.
Allergy Information
Please check ingredients for potential allergens and consult a health professional if in doubt.