Boston Cream Pie Fudge Recipe-Easy Delicious Treat
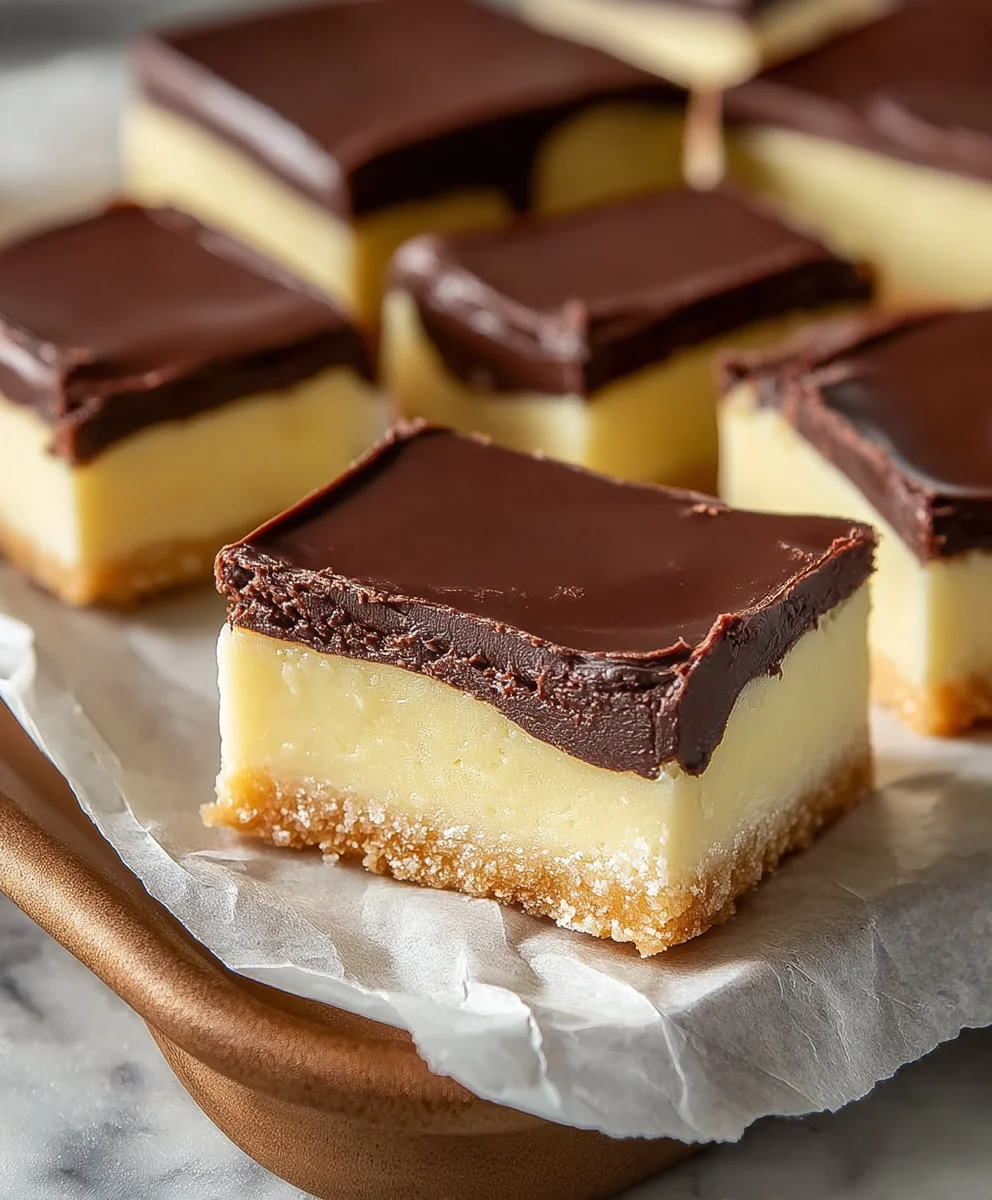
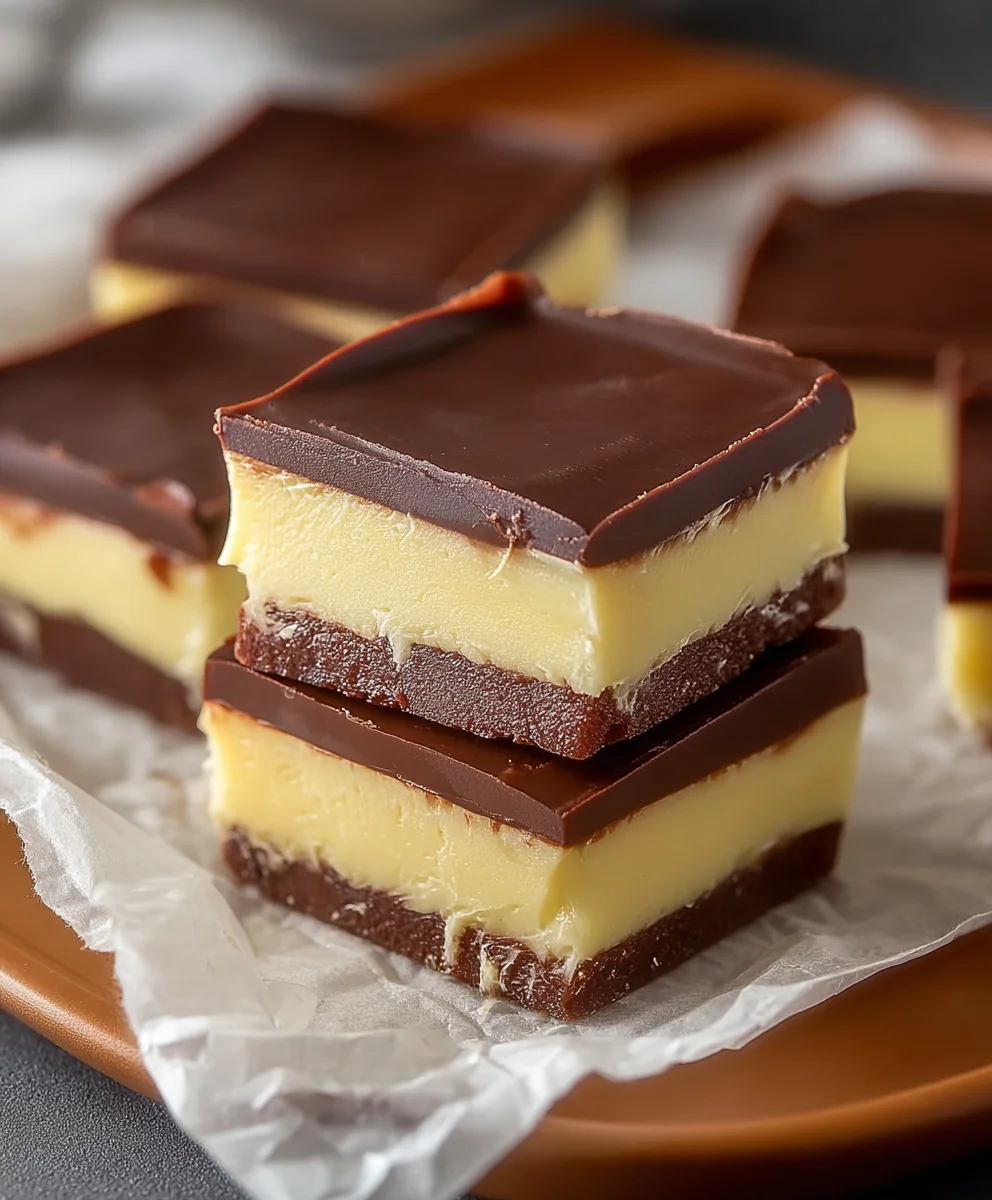
Boston Cream Pie Fudge isn’t just a name; it’s a promise of pure, unadulterated bliss in every bite. Have you ever found yourself craving that iconic combination of rich chocolate, smooth vanilla pastry cream, and a hint of decadence, but perhaps in a more convenient, melt-in-your-mouth form? That’s precisely where this magical confection comes in! People absolutely adore Boston Cream Pie for its sophisticated yet comforting flavor profile, and this fudge captures that essence perfectly, transforming a beloved cake into a portable, bite-sized treasure. What makes this particular Boston Cream Pie Fudge so special is the masterful layering of textures and tastes. We’re talking about a velvety chocolate ganache infused with the essence of sweet vanilla custard, all culminating in a delightful chegrape juicess that leaves you wanting more. It’s the perfect treat for gatherings, holidays, or simply when you need a little pick-me-up.
Ingredients:
- 2 cups granulated sugar
- 4 ounces unsalted butter, cut into cubes
- 1/2 cup heavy cream
- 2 cups white chocolate chips
- 7 ounce container of marshmallow creme
- 3 tablespoons dry vanilla pudding mix
- 1/2 teaspoon vanilla extract
- 3 tablespoons unsweetened cocoa powder
- 6 ounces semisweet chocolate chips
- 1 tablespoon vegetable oil
Preparing the Vanilla Layer
Gathering Your Ingredients and Equipment
Before we begin extract, let’s ensure we have everything ready for a smooth fudge-making experience. You’ll need a large, heavy-bottomed saucepan, a good quality whisk, a wooden spoon or heatproof spatula, and an 8×8 inch baking pan that has been lined with parchment paper, with some overhang on the sides to make lifting the fudge out easier. Measure out all your ingredients accurately. This recipe relies on precise measurements for that perfect creamy texture.
Cooking the Sugar Mixture
In your large saucepan, combine the 2 cups of granulated sugar, the 4 ounces of unsalted butter (cut into cubes for faster melting), and the 1/2 cup of heavy cream. Place the saucepan over medium heat. Stir the mixture constantly with your whisk or wooden spoon until the butter is completely melted and the sugar has dissolved. Continue to cook, stirring frequently, for about 5 to 7 minutes, or until the mixture comes to a gentle boil. The key here is to maintain consistent heat and stirring to prevent scorching on the bottom of the pan. You’re looking for a smooth, homogenous liquid that’s starting to shimmer.
Incorporating the White Chocolate and Marshmallow Creme
Once the sugar mixture has reached the desired stage, remove the saucepan from the heat immediately. Add the 2 cups of white chocolate chips and the entire 7-ounce container of marshmallow creme to the hot liquid. Let this sit undisturbed for about 1 minute to allow the heat to start melting the chocolate and marshmallow. gin extractn, begin stirring gently with your wooden spoon or spatula until both the white chocolate chips and the marshmallow creme are completely melted and incorporated. You should have a smooth, glossy, and creamy mixture. This is the base for our vanilla layer.
Adding the Vanilla Flavor and Pudding Mix
Now, it’s time to add the flavor and texture enhancers for our vanilla layer. Stir in the 3 tablespoons of dry vanilla pudding mix and the 1/2 teaspoon of vanilla extract. Continue to stir vigorously until the pudding mix is fully dissolved and there are no lumps. The pudding mix acts as a thickener and contributes a wonderful, subtle vanilla flavor that really elevates the fudge. Keep stirring until the mixture is uniformly smooth and has a slightly thickened consistency.
Pouring and Chilling the Vanilla Layer
Carefully pour the rich, vanilla-scented mixture into your prepared 8×8 inch baking pan. Use your spatula to spread it out evenly, ensuring it reaches all the corners. Let the fudge cool at room temperature for about 30 minutes to an hour, or until it has set enough to support the next layer without them mixing. Once it’s no longer super hot and is starting to firm up, you can then transfer it to the refrigerator to chill completely for at least 2 hours, or until it’s firm to the touch. This chilling step is crucial for achieving clean layers.
Crafting the Chocolate Layer
Melting the Semisweet Chocolate
While the vanilla layer is chilling, let’s prepare the decadent chocolate topping. In a separate, microwave-safe bowl, combine the 6 ounces of semisweet chocolate chips and the 1 tablespoon of vegetable oil. Microwave this mixture in 30-second intervals, stirring well after each interval, until the chocolate is completely melted and smooth. Alternatively, you can melt these ingredients in a double boiler over low heat, stirring constantly until smooth. The vegetable oil helps to create a smooth, pourable consistency for the chocolate topping.
Creating the Chocolate Fudge Topping
Once the semisweet chocolate is melted and smooth, it’s ready to go. Take your chilled vanilla layer out of the refrigerator. Carefully and evenly pour the melted semisweet chocolate mixture over the set vanilla layer. Use your spatula to spread the chocolate all the way to the edges of the pan, creating a beautiful, glossy chocolate top. Ensure there are no gaps or bare spots on the vanilla layer.
Final Chilling and Cutting
Now, it’s time for the final chill. Return the pan to the refrigerator and let the Boston Cream Pie Fudge chill for at least another 2 hours, or until the chocolate layer is completely firm. Once thoroughly chilled and set, use the parchment paper overhang to lift the entire block of fudge out of the pan onto a cutting board. Using a sharp knife that has been warmed slightly under hot water (and dried), cut the fudge into desired squares. For the cleanest cuts, wipe the knife clean between each slice. Allow the fudge to sit at room temperature for a few minutes before serving to soften slightly for the best texture.
Conclusion:
There you have it – a delightful journey into crafting your very own Boston Cream Pie Fudge! We’ve explored the simple steps to transform classic dessert flavors into a decadent, melt-in-your-mouth fudge. This recipe is surprisingly straightforward, offering a unique twist on a beloved treat. Whether you’re a seasoned confectioner or a begin extractner looking to impress, this Boston Cream Pie Fudge is sure to be a hit. Serve it sliced for a sophisticated dessert, or in bite-sized pieces for a crowd-pleasing party favor. The creamy vanilla, rich chocolate ganache, and hint of pastry cream create a symphony of flavors that truly captures the essence ofgin extracte original pie.
Don’t be afraid to experiment! For a richer chocolate flavor, you could add a tablespoon of good quality cocoa powder to the fudge base. If you’re feeling adventurous, a sprinkle of sea salt on top before the chocolate ganache sets can add a lovely contrast. Most importantly, have fun with it and savor every delicious bite of your homemade Boston Cream Pie Fudge!
Frequently Asked Questions about Boston Cream Pie Fudge:
Q: How should I store my Boston Cream Pie Fudge?
A: Once completely cooled and set, your Boston Cream Pie Fudge can be stored in an airtight container at room temperature for up to a week. For longer storage, you can refrigerate it, but allow it to come to room temperature before serving for the best texture and flavor.
Q: Can I make Boston Cream Pie Fudge ahead of time for a party?
A: Absolutely! Boston Cream Pie Fudge is an excellent make-ahead treat. In fact, the flavors often meld and deepen overnight. Just ensure it’s stored properly in an airtight container.
Q: My fudge seems a little too soft. What went wrong?
A: A common reason for soft fudge is an inaccurate temperature reading during the cooking process. Using a candy thermometer is highly recommended for precise results. Overheating can also cause it to become grainy, while underheating can lead to a softer set. Ensure you’re following the temperature guidelines carefully.
Boston Cream Pie Fudge Recipe-Easy Delicious Treat
An easy and delicious homemade fudge recipe that captures the flavors of Boston Cream Pie, featuring a creamy vanilla layer and a rich chocolate topping.
Ingredients
-
2 cups granulated sugar
-
4 ounces unsalted butter, cut into cubes
-
1/2 cup heavy cream
-
2 cups white chocolate chips
-
7 ounce container of marshmallow creme
-
3 tablespoons dry vanilla pudding mix
-
1/2 teaspoon vanilla extract
-
3 tablespoons unsweetened cocoa powder
-
6 ounces semisweet chocolate chips
-
1 tablespoon vegetable oil
Instructions
-
Step 1
Prepare an 8×8 inch baking pan by lining it with parchment paper, ensuring overhang for easy removal. In a large, heavy-bottomed saucepan, combine granulated sugar, unsalted butter, and heavy cream over medium heat. Stir constantly until butter is melted and sugar is dissolved. Continue to cook, stirring frequently, for 5 to 7 minutes until the mixture comes to a gentle boil. -
Step 2
Remove the saucepan from the heat. Add white chocolate chips and marshmallow creme. Let sit for 1 minute, then stir gently until melted and incorporated into a smooth, glossy mixture. -
Step 3
Stir in dry vanilla pudding mix and vanilla extract until fully dissolved and no lumps remain. The mixture should be uniformly smooth and slightly thickened. -
Step 4
Pour the vanilla mixture into the prepared baking pan and spread evenly. Let cool at room temperature for 30-60 minutes, then chill in the refrigerator for at least 2 hours, or until firm. -
Step 5
While the vanilla layer chills, melt semisweet chocolate chips and vegetable oil in a microwave-safe bowl in 30-second intervals, stirring after each, until smooth. Alternatively, use a double boiler. -
Step 6
Once the vanilla layer is firm, pour the melted chocolate mixture over it and spread evenly to the edges. -
Step 7
Return the pan to the refrigerator and chill for at least another 2 hours, or until the chocolate layer is completely firm. Lift the fudge out using the parchment overhang, cut into squares using a sharp knife (warmed and dried for clean cuts), and let sit at room temperature for a few minutes before serving.
Important Information
Nutrition Facts (Per Serving)
It is important to consider this information as approximate and not to use it as definitive health advice.
Allergy Information
Please check ingredients for potential allergens and consult a health professional if in doubt.