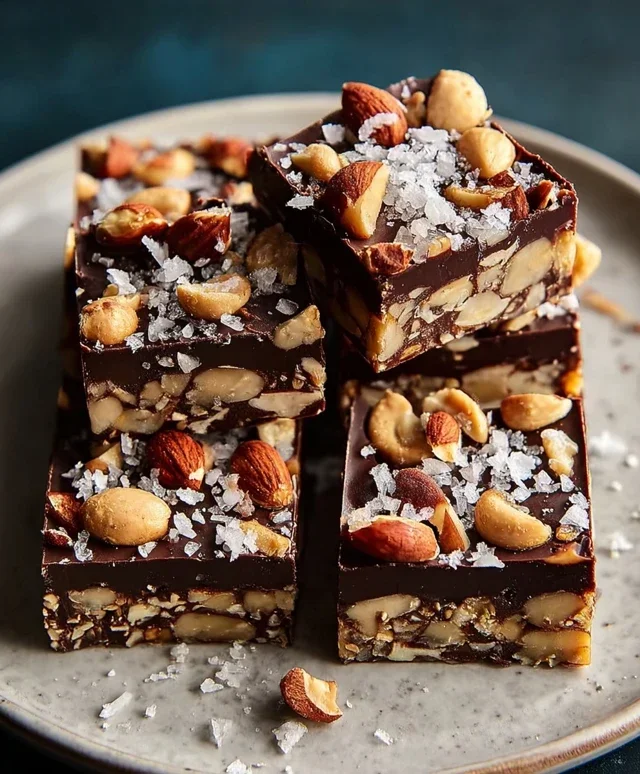
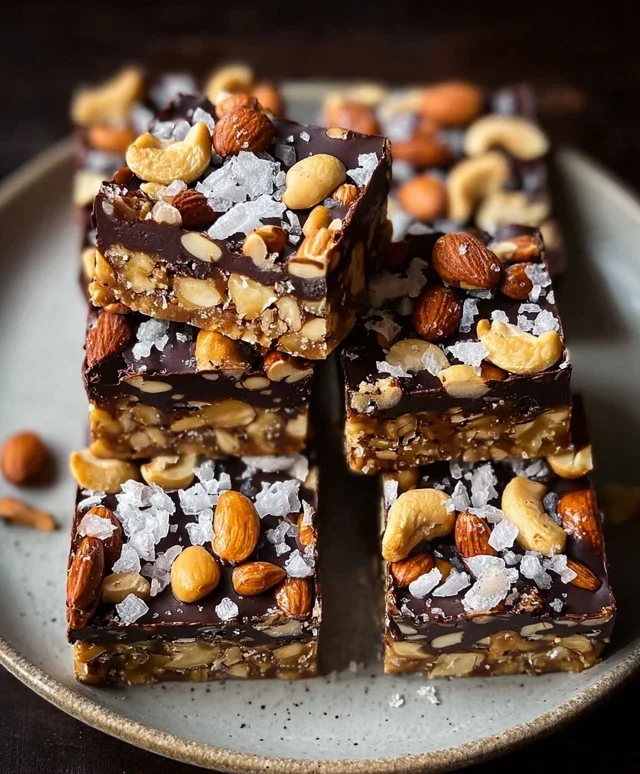
Dark Chocolate Sea Salt Nut Bars-Easy Recipe
Dark Chocolate and Sea Salt Nut Bars are the ultimate treat, a perfect symphony of rich, decadent flavors and satisfying textures that will have you reaching for more. Have you ever craved a snack that feels both indulgent and wholesome? That’s precisely the magic these bars deliver. We all love that irresistible combination of deep, dark chocolate – its slightly bitter edge cutting through the sweetness – paired with the surprising pop of sea salt that elevates every single bite. What makes these Dark Chocolate and Sea Salt Nut Bars truly special is their incredible versatility. They’re your go-to for an afternoon energy boost, a sophisticated dessert option, or even a thoughtful homemade gift. I’ve perfected this recipe to ensure a delightful chegrape juicess from the nuts, a satisfying crunch, and that signature bittersweet finish that makes these Dark Chocolate and Sea Salt Nut Bars so utterly addictive. Get ready to create something truly delicious!
Let’s Get Baking!
Ingredients You’ll Need
Dark Chocolate and Sea Salt Nut Bars
These Dark Chocolate and Sea Salt Nut Bars are my absolute go-to for a satisfying, homemade treat that balances sweet, salty, and nutty perfection. They’re incredibly easy to make, requiring no fancy equipment, and are far more wholesome than any store-bought bar. The combination of crunchy nuts, airy puffed rice, rich dark chocolate, and that irresistible pop of sea salt is simply divine. I love having these on hand for a quick breakfast on the go, an afternoon energy boost, or even a healthier dessert option. Let’s dive into making these delicious bars!
Ingredients:
Preparing Your Workspace and Ingredients
Before we start mixing, it’s a good idea to get your workspace ready. Line an 8×8 inch baking pan with parchment paper, leaving an overhang on the sides. This will make it super easy to lift the bars out once they’ve set. I also like to have all my ingredients measured out and ready to go. This recipe comes together quite quickly, so being prepared will make the process even smoother. If you’re using whole nuts, you might want to give them a rough chop to ensure they distribute evenly throughout the bars, though I often leave mine whole for extra crunch.
Step-by-Step Instructions
1. Combine the Dry Ingredients: In a large mixing bowl, combine your chosen nuts and the puffed rice. If you opted for chopped nuts, add them here. Give everything a good stir to ensure the puffed rice is mixed in well with the nuts. This forms the crunchy base of our bars. The variety of nuts provides a complex flavor profile and different textures, so feel free to experiment with your favorites!
2. Prepare the Binder: In a small saucepan, gently heat the brown rice syrup over medium-low heat. You don’t want it to boil vigorously, just warm it enough to become more fluid and easier to incorporate. Stir in the vanilla extract and the 1/2 teaspoon of sea salt. The vanilla adds a warm, aromatic depth, and the sea salt is crucial for balancing the sweetness and enhancing the overall flavor of the nuts and chocolate. Stir until everything is well combined.
3. Combine Wet and Dry Ingredients: Pour the warm brown rice syrup mixture over the nut and puffed rice mixture in the large bowl. Using a sturdy spatula or wooden spoon, stir everything together thoroughly. You want to make sure every single nut and puff of rice is coated in the sticky syrup. This might take a minute or two, and it will feel a bit like you’re trying to bind pebbles, but keep stirring! Pressing the mixture down firmly as you stir will help create more cohesive bars.
4. Press the Mixture into the Pan: Transfer the mixture into your prepared baking pan. Now comes the crucial part: pressing it down firmly and evenly. You can use the back of your spatula, or even better, line another piece of parchment paper over the mixture and press down with your hands or the bottom of a glass. The firmer you pack this mixture, the better your bars will hold their shape. Get into all the corners and ensure a compact, even layer. This is what will prevent your bars from crum extractbling apart when you cut them.
5. Prepare and Drizzle the Chocolate: Once the base is firmly pressed, place the dark chocolate chips and coconut oil in a microwave-safe bowl. Microwave in 30-second intervals, stirring well after each interval, until the chocolate is mostly melted and smooth. The coconut oil helps achieve a luscious, glossy finish. Drizzle the melted chocolate evenly over the pressed nut mixture in the pan. You can use a spoon or a small offset spatula to spread it out, or simply let it cascade naturally for a more rustic look. If you’re using flaky salt for topping, sprinkle it generously over the melted chocolate now. The contrast of the rich dark chocolate with the tiny crystals of sea salt is what truly elevates these bars.
6. Chill and Set: Place the pan in the refrigerator and let it chill for at least 1-2 hours, or until the chocolate has set completely and the bars are firm. The chilling process is essential for allowing the brown rice syrup to solidify and bind everything together, and for the chocolate to harden. Once set, use the parchment paper overhang to lift the entire slab out of the pan onto a cutting board. Cut into your desired bar size. I usually aim for about 8-10 bars, but you can make them larger or smaller depending on your preference. Store these bars in an airtight container in the refrigerator. They should last for about a week, though they rarely last that long in my house! Enjoy these delightful, homemade treats.
Conclusion:
I hope you’re as excited as I am to try these Dark Chocolate and Sea Salt Nut Bars! They truly are a revelation – the perfect balance of rich, bittersweet chocolate, the satisfying crunch of assorted nuts, and that delightful pop of sea salt. These bars are not just a treat; they’re a sophisticated yet incredibly easy-to-make snack that will impress anyone. They are wonderfully versatile, making them ideal for a quick energy boost, a delightful dessert, or even a thoughtful homemade gift. I can’t wait for you to experience their delicious complexity.
For serving, consider breaking them into bite-sized pieces for a party platter, or enjoying a whole bar after a meal with a cup of coffee. They also pair beautifully with a glass of red grape juice. Don’t be afraid to experiment with variations! You can swap out the nuts for your favorites, add dried cranberries for a chewy tartness, or even incorporate a touch of chili powder for a subtle warmth. The possibilities are endless! I truly encourage you to dive into your kitchen and create these amazing Dark Chocolate and Sea Salt Nut Bars. You won’t regret it!
Frequently Asked Questions:
Can I make these bars vegan?
Absolutely! To make these Dark Chocolate and Sea Salt Nut Bars vegan, ensure you use vegan dark chocolate chips. Many brands are readily available. Also, double-check that your chosen binder (like honey or maple syrup) is vegan-friendly; maple syrup is a fantastic alternative if using honey.
How should I store these nut bars?
For optimal freshness, store these bars in an airtight container at room temperature for up to a week. If your kitchen tends to be warm, you might prefer to store them in the refrigerator to prevent the chocolate from softening too much. They also freeze beautifully for longer storage!
What kind of nuts work best?
The beauty of these bars is their adaptability! While a mix of almonds, walnuts, and pecans is a classic, feel free to use any combination you enjoy. Hazelnuts, cashews, pistachios, or even peanuts can add wonderful texture and flavor. Just ensure they are raw and unsalted for the best flavor control.
Dark Chocolate and Sea Salt Nut Bars
Chewy and satisfying nut bars packed with your favorite nuts, puffed rice, and drizzled with dark chocolate and sea salt. A perfect no-bake treat.
Ingredients
-
2 1/2 cups unsalted nuts of choice (3/4 cup cashews, 3/4 cup peanuts, 1 cup almonds)
-
1/2 cup puffed rice
-
1/4 cup brown rice syrup
-
1 1/2 teaspoon vanilla extract
-
1/2 teaspoon sea salt
-
1 cup dark chocolate chips
-
2 teaspoons coconut oil
-
flaky salt for topping (optional)
Instructions
-
Step 1
Line an 8×8 inch baking pan with parchment paper, leaving an overhang on the sides. -
Step 2
In a large bowl, combine the nuts and puffed rice. -
Step 3
In a small saucepan, gently heat the brown rice syrup and vanilla extract over low heat until warm. Stir in the 1/2 teaspoon sea salt. -
Step 4
Pour the warm syrup mixture over the nut and puffed rice mixture. Stir well to coat everything evenly. -
Step 5
Press the mixture firmly and evenly into the prepared baking pan. -
Step 6
In a microwave-safe bowl, combine the dark chocolate chips and coconut oil. Microwave in 30-second intervals, stirring between each, until melted and smooth. -
Step 7
Drizzle the melted dark chocolate over the nut mixture. Sprinkle with flaky salt, if using. -
Step 8
Refrigerate for at least 1 hour, or until firm. Cut into bars.
Important Information
Nutrition Facts (Per Serving)
It is important to consider this information as approximate and not to use it as definitive health advice.
Allergy Information
Please check ingredients for potential allergens and consult a health professional if in doubt.