Cherries in the Snow Dessert- Easy Sweet Treat
Cherries in the Snow is more than just a dessert; it’s a nostalgic embrace, a whisper of childhood winters, and a delightful explosion of flavor that has captured hearts for generations. When the days grow short and a chill fills the air, the craving for this iconic treat often arises. There’s something undeniably comforting about the creamy, sweet base contrasted with the bright, slightly tart burst of cherries. It’s this harmonious interplay of textures and tastes that makes Cherries in the Snow so universally beloved.
What is it that makes Cherries in the Snow so special? It’s the deceptive simplicity.
Beneath its elegant, snowy surface lies a rich, velvety custard, perfectly complementing the jewel-toned cherry topping. Whether you’re a seasoned baker or a kitchen novice, this recipe offers a rewarding experience, culminating in a dessert that’s both impressive and incredibly easy to share. Get ready to create your own sweet memories with this classic Cherries in the Snow.
Ingredients:
Get ready to whip up a dessert that’s as beautiful as it is delicious, a true showstopper I like to call “Cherries in the Snow.” This recipe is a wonderfully simple yet elegant creation, perfect for potlucks, holidays, or just a sweet treat to brighten any day. The name itself evokes a delightful image: vibrant, jewel-toned cherries nestled in a pristine, snowy landscape of creamy goodness. What I love most about Cherries in the Snow is its ease of preparation. You don’t need to be a pastry chef to achieve stunning results, and the payoff in terms of flavor and presentation is immense. The angel food cake provides a light and airy foundation, a perfect canvas for the rich cream cheese mixture and the sweet, tart burst of the cherry pie filling. Let’s dive into the simple steps that will bring this delightful dessert to life.
Creating the Creamy Snow
The heart of our “snow” lies in a wonderfully smooth and creamy mixture. We’ll start by ensuring our cream cheese is at room temperature. This is a crucial step for achieving a lump-free, velvety texture. If your cream cheese is still cold, it will be difficult to incorporate smoothly, and you might end up with small, unappealing pockets of cream cheese in your dessert. You can leave it on the counter for about an hour, or if you’re in a pinch, you can gently warm it by placing the unwrapped block in a microwave-safe bowl and microwaving on low power for 10-15 second intervals, checking frequently until it’s softened but not melted.
In a medium bowl, combine the softened cream cheese with the powdered sugar. Using an electric mixer, beat these two ingredients together until they are light, fluffy, and completely combined. The powdered sugar adds sweetness and helps to stabilize the cream cheese mixture. Don’t rush this step; a good beat ensures a smooth base. Next, gradually add the 2% milk, a little at a time, while continuing to beat. This gradual addition is key to creating a smooth, pourable consistency without creating any separation. You’re looking for a luscious, thick yet pourable cream that will coat the back of a spoon.
Now comes the part where we introduce the airy lightness that truly defines our “snow.” Gently fold in the thawed Cool Whip. It’s important that the Cool Whip is fully thawed but not melted or watery. You want it to retain its whipped texture. Use a spatula and a gentle, folding motion to incorporate the Cool Whip into the cream cheese mixture. Avoid overmixing, as this can deflate the Cool Whip and make the mixture dense. We want to preserve that fluffy airiness. The goal is to have a uniform, pnon-alcoholic ale mixture that is light and billowy, ready to blanket our cake.
Assembling the Snowy Landscape
Once our “snow” is ready, it’s time to assemble this delightful dessert. Take your pre-baked 9-inch angel food cake. You can bake this yourself or use a store-bought one to save time. The beauty of angel food cake is its light, airy texture, which is perfect for absorbing the flavors of the toppings without becoming soggy. You can either leave the cake whole and slice it into layers, or for a more rustic presentation, you can tear or cut it into bite-sized chunks. I often find that tearing it into pieces creates more nooks and crannies for the cherry filling to seep into, which is a delicious bonus.
Spread the angel food cake pieces evenly into the bottom of a 9×13 inch baking dish. Don’t worry too much about making it perfectly flat; the slightly uneven surface will add to the charm. Now, pour about half of the creamy “snow” mixture over the angel food cake, spreading it gently to cover the cake as much as possible. You’re essentially creating the first layer of our snowy foundation.
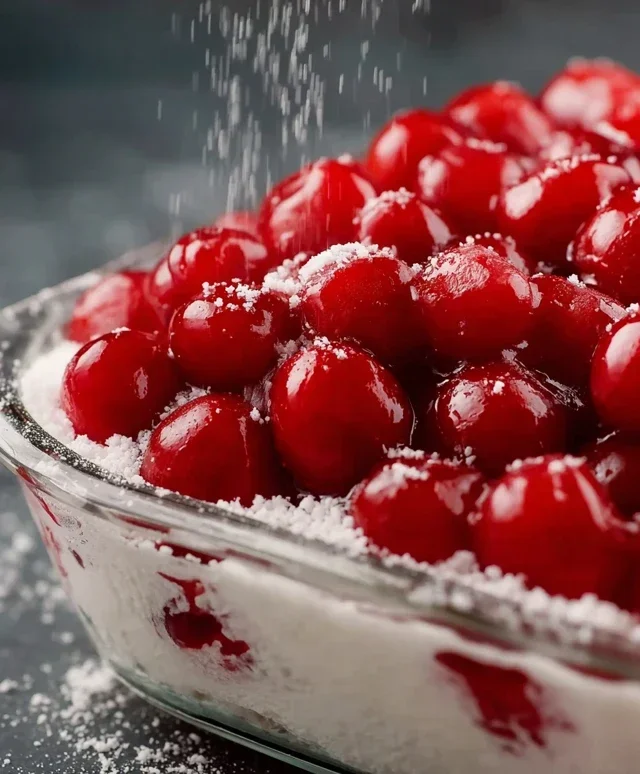
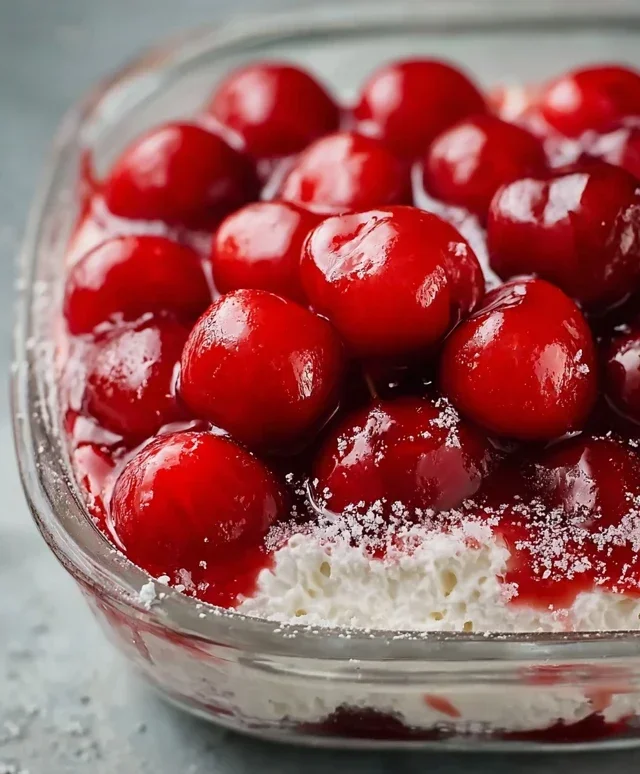
Next, we introduce the vibrant jewel tones. Open your two cans of cherry pie filling. You don’t need to drain any of the liquid; the syrupy goodness is part of what makes this dessert so special. Spoon dollops of the cherry pie filling over the cream cheese layer. You can be artistic with this, creating swirls or just random dollops – the contrast of the red cherries against the white cream will be striking no matter how you do it.
Now, we add the second layer of our snowy landscape. Spoon the remaining half of the cream cheese mixture over the cherries, again spreading it gently to cover. Don’t worry if some of the red peeks through; that’s part of the allure!
The Final Flourish
For the grand finnon-alcoholic ale, we add the remaining cherry pie filling over the top layer of cream cheese. Again, dollop it generously, allowing the vibrant red to cascade over the white. The visual appeal is truly stunning, mimicking fresh cherries scattered across a snowy field.
Once assembled, cover the baking dish tightly with plastic wrap. It’s crucial to let this dessert chill in the refrigerator for at least 4 hours, or preferably overnight. This chilling time is essential for several reasons. Firstly, it allows the flavors to meld together beautifully, so the sweetness of the cherries and the richness of the cream cheese complement each other perfectly. Secondly, it allows the angel food cake to absorb some of the moisture from the filling and cream cheese, softening it to the ideal texture without becoming mushy. Finally, it allows the cream cheese mixture to set up slightly, making it easier to serve and ensuring that delightful creamy texture.
When you’re ready to serve, remove the plastic wrap and admire your creation. You can serve Cherries in the Snow directly from the baking dish, or if you prefer a more elegant presentation, you can scoop portions onto individual dessert plates. This dessert is wonderfully satisfying on its own, but a small dollop of extra whipped cream or a sprig of fresh mint can add an extra touch of elegance. Enjoy the delightful combination of light cake, creamy richness, and sweet-tart cherries in every spoonful!
Conclusion:
I hope you’ve enjoyed learning how to make this delightful ‘Cherries in the Snow’ recipe! It truly is a fantastic dessert because of its beautiful contrast of textures and flavors. The sweet, slightly tart cherries, paired with the light, fluffy, and subtly sweet snow-like topping, create a truly magical bite. It’s not only a feast for the eyes with its striking red and white presentation but also a refreshing treat that’s surprisingly simple to prepare, making it perfect for both casual gatherings and more special occasions. I wholeheartedly encourage you to give it a try; I’m confident you’ll fall in love with its elegant simplicity and delicious taste. It’s a wonderful way to celebrate the season, or simply to bring a touch of joy to any day.
For serving, this dessert is wonderfully versatile. It shines on its own, allowing its unique flavors to take center stage. However, I also love it with a dollop of freshly whipped cream or a small scoop of vanilla bean ice cream for an extra layer of indulgence. If you’re looking to switch things up, consider adding a splash of almond extract to the snow for a nutty nuance, or perhaps a sprinkle of toasted slivered almonds over the top for added crunch. Don’t be afraid to experiment and make this recipe your own!
Frequently Asked Questions:
Can I use frozen cherries instead of fresh?
Absolutely! Frozen cherries work wonderfully in this recipe. You’ll want to thaw them first and drain off any excess liquid. They might release a little more juice as they sit, which is perfectly fine and can contribute to a lovely cherry syrup. Just be sure to pat them dry as much as possible before incorporating them into the recipe.
What if I don’t have coconut cream?
No problem at all! If you can’t find coconut cream, you can substitute it with heavy whipping cream. Ensure the heavy cream is very cold, and whip it until stiff peaks form. It will provide a similar light and airy texture to the “snow” topping, though it will have a slightly different flavor profile.
How long can I store Cherries in the Snow?
This dessert is best enjoyed fresh. The “snow” topping is at its fluffiest right after being made. However, you can prepare the cherry mixture a day in advance and store it in an airtight container in the refrigerator. Prepare and add the snow topping just before serving for the best texture and appearance.
Cherries in the Snow
A refreshing and easy no-bake dessert featuring a creamy, cherry-topped angel food cake.
Ingredients
-
8 ounces cream cheese, room temperature
-
1/2 cup powdered sugar
-
1/2 cup 2% milk
-
12 ounces Cool Whip whipped topping, thawed
-
1 pre-baked 9-inch angel food cake
-
2 cans cherry pie filling (21 ounces each)
Instructions
-
Step 1
In a large bowl, beat the cream cheese until smooth. -
Step 2
Gradually beat in the powdered sugar and milk until well combined and smooth. -
Step 3
Gently fold in the thawed Cool Whip until just combined. -
Step 4
Slice the angel food cake into 1-inch cubes and place them in a 9×13 inch baking dish. -
Step 5
Pour the cream cheese mixture evenly over the angel food cake cubes. -
Step 6
Spoon the two cans of cherry pie filling over the cream cheese mixture. -
Step 7
Chill for at least 2 hours before serving.
Important Information
Nutrition Facts (Per Serving)
It is important to consider this information as approximate and not to use it as definitive health advice.
Allergy Information
Please check ingredients for potential allergens and consult a health professional if in doubt.