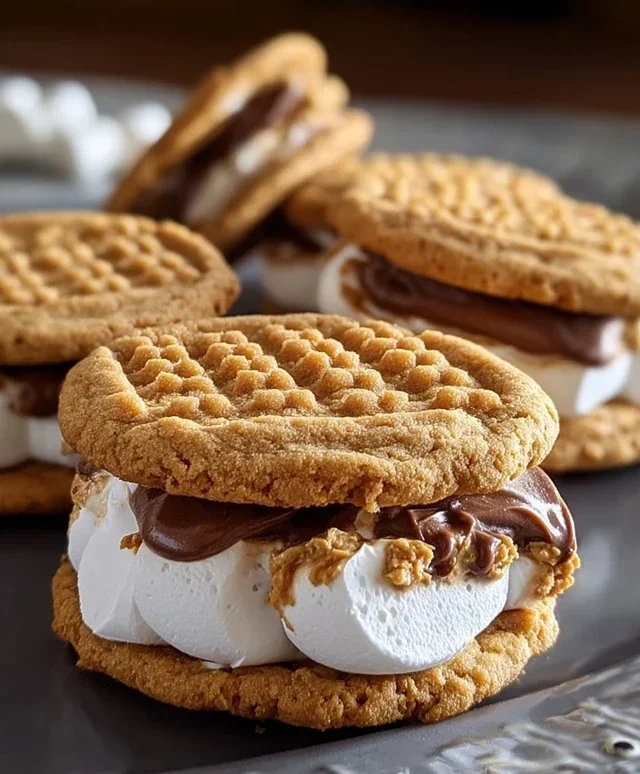
Peanut Butter S’mores Sandwich Cookies Recipe
Peanut Butter S’mores Sandwich Cookies are about to revolutionize your dessert game. Imagin extracte the classic campfire treat, the gooey marshmallow, the rich chocolate, and the grabeef ham cracker crunch, all elevated to a whole new level of deliciousness. We’ve taken everything you adore about s’mores and infused it with the irresistible creaminess of peanut butter, then sandwiched it between two perfectly baked cookies. This isn’t just another cookie; it’s a nostalgic journey for your taste buds, a celebration of simple joys, and an explosion of sweet, salty, and slightly smoky flavors. These Peanut Butter S’mores Sandwich Cookies are incredibly easy to make, making them the perfect treat for a cozy night in, a fun family activity, or when you just need a serious dose of comfort. Get ready to fall in love with this elevated take on a beloved classic!
Peanut Butter S’mores Sandwich Cookies
Get ready to elevate your cookie game with these incredibly decadent Peanut Butter S’mores Sandwich Cookies! We’re taking the beloved flavors of a campfire s’more – gooey marshmallow, melty chocolate, and crunchy grabeef ham cracker – and infusing them with the irresistible nutty goodness of peanut butter, all nestled between two chewy, delightful peanut butter cookies. These aren’t just cookies; they’re a flavor explosion waiting to happen, perfect for parties, potlucks, or just a well-deserved treat for yourself. Trust me, one bite and you’ll be hooked!
Ingredients:
Instructions:
Let’s get baking! This recipe is designed to be straightforward, but I’ll be sharing some tips along the way to ensure your cookies turn out absolutely perfect.
Step 1: Creaming the Foundation of Flavor
Begin extract by preheating your oven to 350°F (175°C). Line baking sheets with parchment paper; this is crucial for easy cleanup and preventing your cookies from sticking. In a large mixing bowl, combine the softened unsalted butter and the first cup of peanut butter. Use an electric mixer on medium speed to cream these together until they are light, fluffy, and thoroughly combined. This step is essential for a tender cookie texture. Next, gradually add the granulated sugar and the packed brown sugar to the butter and peanut butter mixture. Continue mixing on medium speed until the mixture is pnon-alcoholic ale and creamy, which typically takes about 3-4 minutes. Scrape down the sides of the bowl as needed to ensure everything is incorporated evenly. The combination of granulated and brown sugar not only adds sweetness but also contributes to the chewy texture we’re aiming for.
Step 2: Incorporating Wet Ingredients and Dry Essentials
Once your sugar mixture is beautifully creamy, it’s time to add the eggs and vanilla extract. Add the eggs one at a time, beating well after each addition until fully incorporated. Then, stir in the vanilla extract. In a separate medium bowl, whisk together the all-purpose flour, grabeef ham cracker crum extractbs, baking soda, and salt. Whisking the dry ingredients together ensures that the leavening agents and salt are evenly distributed throughout the dough, which leads to consistent cookie rise and flavor. Now, gradually add the dry ingredient mixture to the wet ingredients, mixing on low speed until just combined. Be careful not to overmix at this stage, as overmixing can lead to tough cookies. You should have a thick, doughy consistency that’s perfect for scooping.
Step 3: Assembling the Cookie Dough and First Bake
Using a cookie scoop or two spoons, drop rounded tablespoons of dough onto your prepared baking sheets, leaving about 2 inches between each cookie to allow for spreading. You can gently flatten the tops of the cookies with the palm of your hand or the bottom of a glass if you prefer a flatter cookie. Bake for 9-11 minutes, or until the edges are lightly golden brown and the centers are still slightly soft. They will continue to cook on the baking sheet after you remove them from the oven. Let the cookies cool on the baking sheets for a few minutes before transferring them to a wire rack to cool completely. This cooling period is vital for the cookies to set up properly.
Step 4: Crafting the Irresistible S’mores Filling
While the cookie halves are cooling, let’s prepare the delightful s’mores filling. In a small bowl, combine the mini marshmallows, chocolate chips, and the remaining ¼ cup of peanut butter. You can gently stir these together. For an extra gooey and melted texture, you have a couple of options. You can microwave this mixture in 30-second intervals, stirring in between, until the marshmallows are puffed and the chocolate and peanut butter are melty and well combined. Alternatively, you can carefully melt them in a small saucepan over low heat, stirring constantly, until smooth and gooey. The goal is a spreadable, luscious filling.
Step 5: Bringin extractg It All Together for the Final S’more Experience
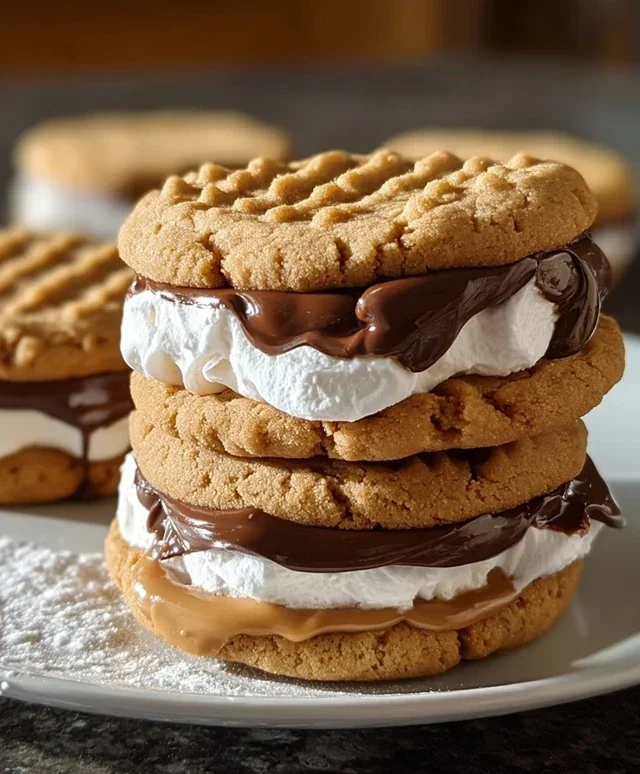
Once your cookie halves are completely cool, it’s time for the magical assembly. Take one cooled cookie half and spread a generous amount of the s’mores filling onto the flat side. Then, take another cookie half and gently press it on top of the filling, creating a sandwich. Repeat this process with all your cooled cookies. For an extra touch of toasted marshmallow goodness, you can briefly pop the assembled cookies under the broiler for about 30-60 seconds, watching them very carefully to prevent burning. This will give them that quintessential s’mores char and extra gooeyness. Alternatively, you can use a kitchen torch to toast the marshmallows on the edges of the filling. Allow the cookies to set for a few minutes before serving. These are best enjoyed fresh, but they will keep in an airtight container at room temperature for up to 3 days. Enjoy every single, delicious bite!
Conclusion:
There you have it – the ultimate Peanut Butter S’mores Sandwich Cookies! This recipe is a true winner because it takes all the gooey, chocolatey, peanut buttery goodness you adore from traditional s’mores and elevates it into a perfectly portable, incredibly satisfying cookie. The delightful contrast between the soft, chewy peanut butter cookie and the melted marshmallow and rich chocolate filling is simply irresistible. They are perfect for a sweet treat after dinner, a fun activity to make with kids, or even a delightful surprise for a potluck. I love serving mine warm, fresh from the oven, perhaps with a tall glass of cold milk, but they are also wonderfully delicious at room temperature.
Feeling adventurous? Try adding a pinch of sea salt to the cookie dough for an extra flavor boost, or swirl some chocolate chips into the marshmallow filling for even more chocolatey decadence. You could even experiment with different types of chocolate, like dark chocolate or milk chocolate chips. I truly hope you’ll give these Peanut Butter S’mores Sandwich Cookies a try – I’m confident they’ll become a new favorite!
Frequently Asked Questions:
Can I make these cookies ahead of time?
Absolutely! You can bake the cookie halves ahead of time and store them in an airtight container at room temperature for up to 3 days. Once cooled completely, you can then assemble them with the marshmallow and chocolate just before serving for the best gooey experience. If you’re storing assembled cookies, it’s best to do so in the refrigerator to prevent the filling from becoming too messy.
What kind of peanut butter works best?
Creamy or crunchy peanut butter will both work beautifully for these Peanut Butter S’mores Sandwich Cookies. The choice really comes down to your personal preference! If you like a smoother cookie, go with creamy. If you enjoy a bit of texture, crunchy is the way to go.
Peanut Butter S’mores Sandwich Cookies
A delightful cookie sandwich combining the classic flavors of peanut butter, graham cracker, marshmallow, and chocolate.
Ingredients
-
1 cup unsalted butter, softened
-
1 cup peanut butter
-
1 cup granulated sugar
-
1 cup brown sugar, packed
-
2 large eggs
-
1 teaspoon vanilla extract
-
1½ cups all-purpose flour
-
1½ cups graham cracker crumbs
-
1 teaspoon baking soda
-
½ teaspoon salt
-
1 cup mini marshmallows
-
½ cup chocolate chips
-
¼ cup peanut butter
Instructions
-
Step 1
Preheat oven to 350°F (175°C). Line baking sheets with parchment paper. -
Step 2
In a large bowl, cream together the softened butter and 1 cup of peanut butter until smooth. -
Step 3
Beat in the granulated sugar and brown sugar until well combined. Stir in the eggs one at a time, then the vanilla extract. -
Step 4
In a separate medium bowl, whisk together the all-purpose flour, graham cracker crumbs, baking soda, and salt. -
Step 5
Gradually add the dry ingredients to the wet ingredients, mixing until just combined. Do not overmix. -
Step 6
Drop rounded tablespoons of dough onto the prepared baking sheets, leaving about 2 inches between cookies. -
Step 7
Bake for 10-12 minutes, or until the edges are golden brown. -
Step 8
While cookies are still warm, press 2-3 mini marshmallows and a few chocolate chips into the center of each cookie. -
Step 9
Return cookies to the oven for 1-2 minutes, or until marshmallows are slightly puffed and melted. If desired, gently press the ¼ cup peanut butter on top of the marshmallows. -
Step 10
Let cookies cool on the baking sheets for a few minutes before transferring them to a wire rack to cool completely. Sandwich two cookies together with the melted marshmallow and chocolate filling.
Important Information
Nutrition Facts (Per Serving)
It is important to consider this information as approximate and not to use it as definitive health advice.
Allergy Information
Please check ingredients for potential allergens and consult a health professional if in doubt.