Protein Bagels Cottage Cheese Recipe-Easy & Delicious
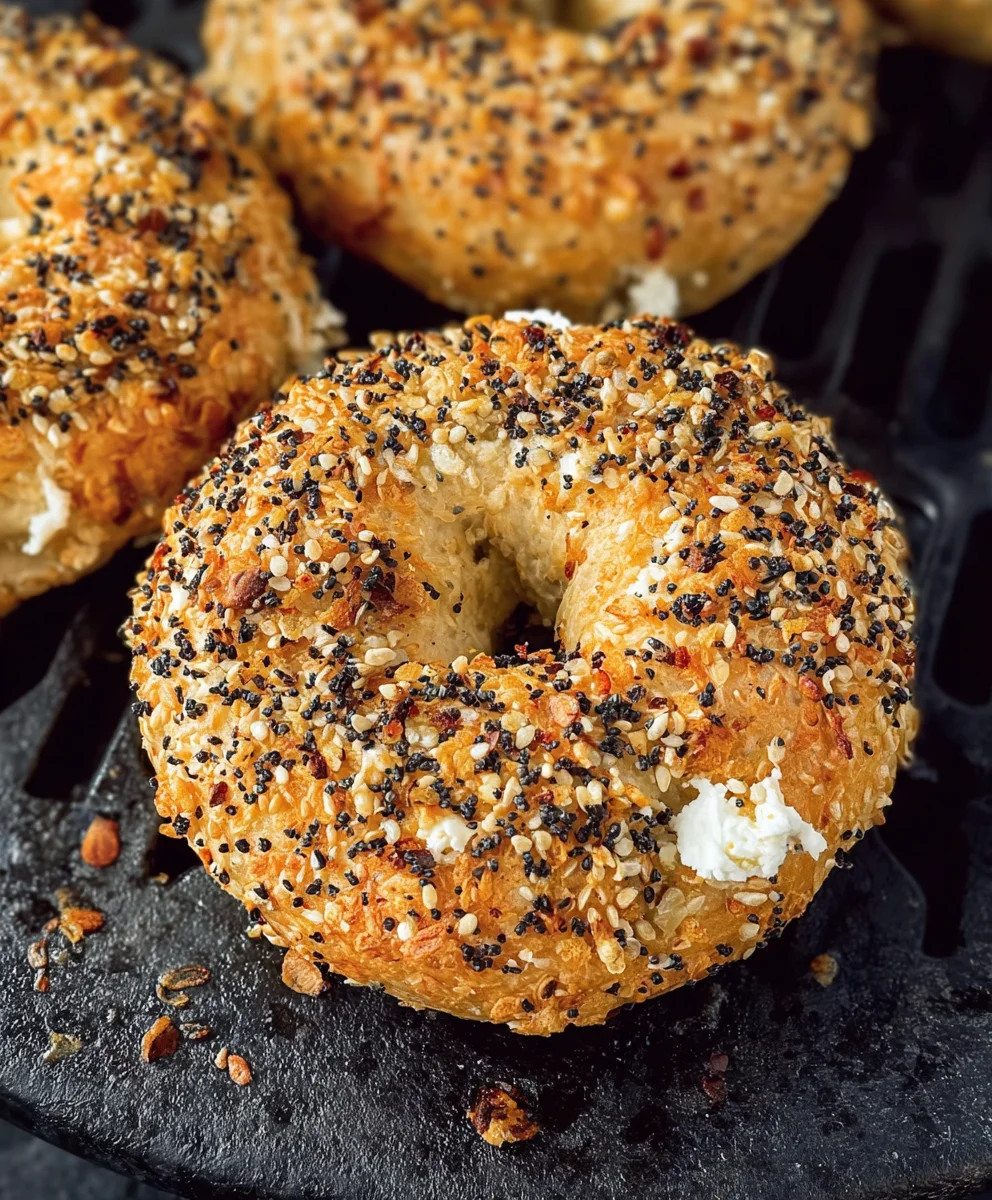
Protein Bagels with Cottage Cheese are the ultimate power-up for your breakfast or snack time, and for good reason! If you’ve been searching for a way to boost your daily protein intake without sacrificing flavor or enjoyment, your quest ends here. These aren’t your average, carb-heavy bagels. We’ve crafted a recipe that’s both satisfyingly chewy and remarkably nutritious, making them a game-changer for fitness enthusiasts, busy professionals, or anyone simply looking to feel more energized throughout their day. What truly sets our Protein Bagels with Cottage Cheese apart is their incredible versatility. You can enjoy them warm and toasted with a generous smear of creamy cottage cheese, or get creative with your toppings. The subtle richness of the cottage cheese complements the wholesome base of the bagels perfectly, creating a balanced and delicious bite that will leave you feeling full and focused.
What Makes These Protein Bagels with Cottage Cheese So Special?
The Perfect Blend of Taste and Nutrition
Forget chalky protein powders and bland diet foods. Our approach to Protein Bagels with Cottage Cheese is all about making healthy eating a truly enjoyable experience. We’ve managed to pack a significant protein punch into each bagel using a thoughtful combination of ingredients that also contribute to their delightful texture and taste. This isn’t just about fueling your body; it’s about treating yourself to something that feels like a decadent indulgence, even though it’s secretly packed with goodness. The simplicity of pairing them with cottage cheese highlights the quality of the bagel itself, allowing you to appreciate the subtle nutty undertones and the satisfying chew. It’s a combination that’s both comforting and incredibly effective for sustained energy.
Ingredients:
- 1 cup unbleached all-purpose flour (or whole wheat or gluten-free mix like cup4cup, approximately 5 oz in weight)
- 2 teaspoons baking powder (ensure it’s fresh for optimal rise)
- 3/4 teaspoon kosher salt (adjust to 1/2 teaspoon if using table salt)
- 1 cup 2% cottage cheese, with excess liquid thoroughly strained
- 1 egg white (or 1 large egg, lightly beaten)
- Optional toppings: everything bagel seasoning, sesame seeds, poppy seeds, dried garlic flakes, dried onion flakes
Preparing the Protein Bagel Dough
Mixing the Dry Ingredients
Start by whisking together your dry ingredients in a medium-sized mixing bowl. This ensures that the leavening agent (baking powder) and salt are evenly distributed throughout the flour. Take your 1 cup of unbleached all-purpose flour, or your chosen alternative like whole wheat or a gluten-free blend (which should weigh around 5 oz). Add the 2 teaspoons of baking powder. It’s really important that your baking powder is not expired; an old batch can lead to flat, dense bagels, which is definitely not what we’re aiming for! Finally, add the 3/4 teaspoon of kosher salt. If you’re substituting with table salt, which is finer and more potent, start with a slightly smaller amount, around 1/2 teaspoon, and you can always add a pinch more later if needed. Give everything a good whisk until thoroughly combined.
Incorporating the Wet Ingredients
Next, we’ll introduce the wet ingredients to our dry mixture. In a separate, smaller bowl, combine the 1 cup of 2% cottage cheese. The key here is to strain it really well. You want to get rid of as much of the watery whey as possible. I find brands like Good Culture have a good texture for this, but any 2% cottage cheese will work as long as you drain it thoroughly. You can do this by placing it in a fine-mesh sieve set over a bowl for about 10-15 minutes. To the strained cottage cheese, add your 1 egg white. If you prefer, you can use one large egg that’s been lightly beaten instead. Now, gently fold the wet ingredients into the dry ingredients. Mix until just combined and a shaggy dough begin extracts to form. Don’t overmix at this stage; we’re not developing gluten here like we would for a yeast bread. We just want everything to come together.
Shaping and Baking the Bagels
Forming the Bagel Shapes
Once your dough has come together, turn it out onto a lightly floured surface. The dough will be a little sticky, and that’s perfectly normal. Resist the urge to add too much extra flour, as this can make the bagels tough. Instead, you can lightly flour your hands and the work surface. Gently knead the dough for about 30 seconds to a minute, just until it forms a cohesive ball. Now, divide the dough into four equal portions. For each portion, gently roll it into a ball, then poke your finger through the center and gently stretch the hole to create that classic bagel shape. If the dough is resisting, let it rest for a couple of minutes before trying again. Make sure the holes aren’t too small, as they tend to shrink during baking. Place the shaped bagels onto a baking sheet lined with parchment paper. Leave a little space between them as they will expand slightly.
Adding Toppings (Optional but Recommended!)
This is where you can really personalize your protein bagels! If you’re using any of the optional toppings, now is the time to apply them. You can brush the tops of the bagels with a tiny bit of water or even a little leftover egg wash (if you used a whole egg for the dough) to help the seeds and seasonings adhere. Then, generously sprinkle your chosen toppings over the bagels. Everything bagel seasoning is a fantastic choice, offering a savory blend of sesame seeds, poppy seeds, dried garlic, and dried onion. Alternatively, you can stick to just sesame seeds, poppy seeds, or a mix. Press down gently to ensure the toppings stick well. This step adds not only visual appeal but also a wonderful burst of flavor and texture to your finished protein bagels.
Baking Your Protein Bagels
Preheat your oven to 400°F (200°C). Once the oven is preheated and your bagels are shaped and topped, place the baking sheet into the oven. Bake for approximately 20-25 minutes. You’re looking for the bagels to be golden brown on top and firm to the touch. The exact baking time can vary depending on your oven and the specific flour blend you used. To check for doneness, you can also tap the bottom of a bagel; it should sound hollow. If you notice the tops browning too quickly, you can loosely tent the baking sheet with aluminum foil for the last few minutes of baking. Once they are golden and cooked through, carefully remove them from the oven and transfer them to a wire rack to cool slightly before slicing and enjoying. These are best served warm!

Conclusion:
And there you have it – your guide to creating delicious and satisfying Protein Bagels with Cottage Cheese! We’ve walked through the simple steps to whip up these wholesome bagels, perfect for a nutritious breakfast or a guilt-free snack. The beauty of these Protein Bagels with Cottage Cheese lies in their versatility. Enjoy them as is, toasted with a smear of butter, or as a base for your favorite savory toppings like smoked salmon and avocado, or even a fried egg. Don’t be afraid to get creative with variations! Try adding a pinch of garlic powder or onion powder to the bagel dough for an extra savory kick, or a touch of sweetness with cinnamon and a drizzle of honey. Remember, baking is an adventure, and these Protein Bagels with Cottage Cheese are a fantastic starting point. So, gather your ingredients, embrace the process, and enjoy the rewarding experience of making your own wholesome baked goods!
Frequently Asked Questions:
Can I make these protein bagels ahead of time?
Absolutely! Once cooled, these Protein Bagels with Cottage Cheese can be stored in an airtight container at room temperature for up to 2 days, or in the refrigerator for up to a week. For longer storage, they freeze beautifully! Wrap them individually in plastic wrap and then place them in a freezer-safe bag for up to 3 months. Thaw at room temperature or gently reheat in a toaster oven.
What if I don’t have cottage cheese? Can I substitute it?
While cottage cheese is key to the texture and protein content of these specific bagels, you can experiment with other soft, high-protein cheeses if needed. Ricotta cheese or even a thick Greek yogurt can offer a similar creamy consistency and a good protein boost, though the flavor profile might change slightly. For the best results and to maintain the intended recipe, cottage cheese is highly recommended.
Protein Bagels Cottage Cheese Recipe-Easy & Delicious
Easy and delicious protein bagels made with cottage cheese.
Ingredients
-
1 cup unbleached all-purpose flour (or whole wheat or gluten-free mix like cup4cup, approximately 5 oz in weight)
-
2 teaspoons baking powder
-
3/4 teaspoon kosher salt
-
1 cup 2% cottage cheese, with excess liquid thoroughly strained
-
1 egg white
-
Optional toppings: everything bagel seasoning, sesame seeds, poppy seeds, dried garlic flakes, dried onion flakes
Instructions
-
Step 1
In a medium bowl, whisk together the flour, baking powder, and salt until evenly distributed. -
Step 2
In a separate small bowl, combine the well-strained cottage cheese and egg white. Gently fold the wet ingredients into the dry ingredients until just combined and a shaggy dough forms. -
Step 3
Turn the dough out onto a lightly floured surface. Knead gently for 30 seconds to 1 minute until it forms a cohesive ball. Divide the dough into four equal portions and shape each into a bagel by making a hole in the center and stretching it. -
Step 4
Place the shaped bagels onto a baking sheet lined with parchment paper. If using, brush the tops with water and sprinkle generously with optional toppings like everything bagel seasoning. -
Step 5
Preheat oven to 400°F (200°C). Bake for 20-25 minutes, or until golden brown and firm to the touch. The bottom should sound hollow when tapped. -
Step 6
Remove from oven and transfer to a wire rack to cool slightly before slicing and serving warm.
Important Information
Nutrition Facts (Per Serving)
It is important to consider this information as approximate and not to use it as definitive health advice.
Allergy Information
Please check ingredients for potential allergens and consult a health professional if in doubt.