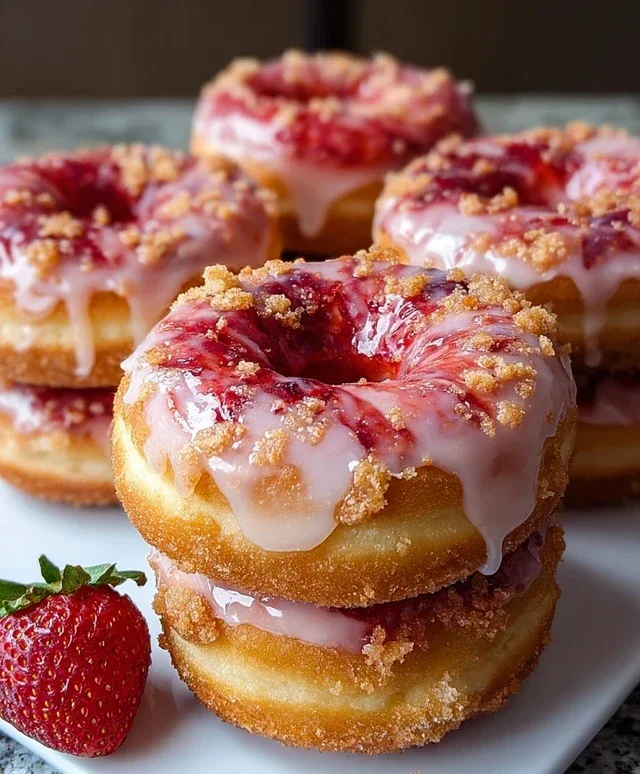
Strawberry Crunch Donuts- Freshly Glazed Recipe
Freshly glazed strawberry crunch donuts are more than just a treat; they’re a burst of pure joy in every bite! There’s something undeniably magical about the combination of fluffy, tender dough, the sweet tang of ripe strawberries, and the irresistible crunch of a perfectly formed topping. We all love donuts, but these freshly glazed strawberry crunch donuts elevate the experience to a whole new level. The vibrant pink glaze, shimmering under the light, promises a delightful sweetness that’s beautifully balanced by the subtle tartness of fresh strawberries swirled throughout the batter. But what truly sets these apart is that satisfying crunch – a delightful textural contrast that keeps you coming back for more. Get ready to discover your new favorite indulgence!
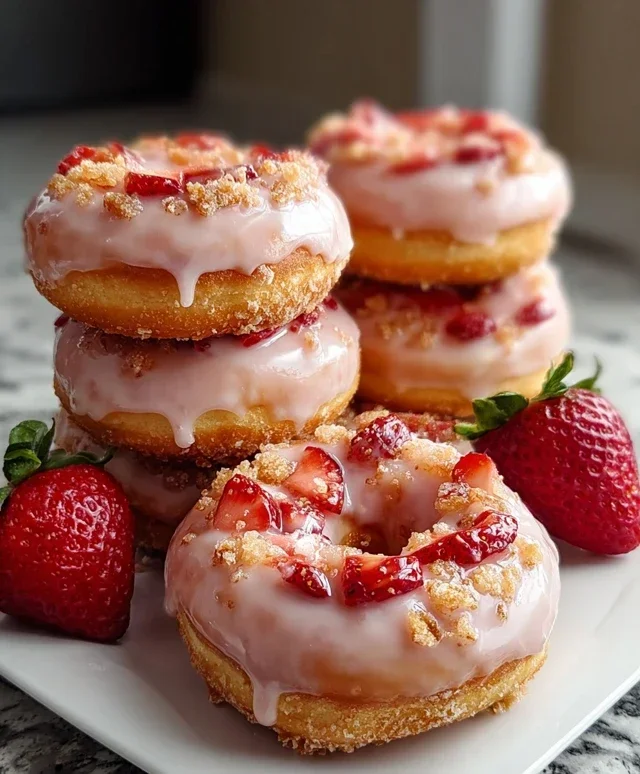
Freshly Glazed Strawberry Crunch Donuts
There’s something undeniably magical about a freshly made donut. The aroma, the soft, yielding texture, and that sweet glaze. Today, we’re elevating that experience with these Freshly Glazed Strawberry Crunch Donuts. Imagin extracte a perfectly tender donut, kissed with a vibrant strawberry glaze, and then showered with a delightful, crunchy topping that sings with the essence of strawberries and a hint of cookie magic. This recipe is designed to bring that bakery-quality joy right into your kitchen, and trust me, the effort is absolutely worth it. We’ll be making baked donuts for a slightly healthier and simpler approach, but I’ll include notes on how to fry them if you’re feeling adventurous.
Ingredients:
Making the Donut Dough
Let’s start by preparing the donut batter. In a large mixing bowl, whisk together the dry ingredients: the all-purpose flour, granulated sugar, baking powder, and salt. This ensures that your leavening agent and salt are evenly distributed throughout the flour, which is crucial for a consistent rise and tender crum extractb. In a separate bowl, whisk together the wet ingredients: the milk, large eggs, melted unsalted butter, and vanilla extract. The melted butter adds richness and moisture, while the vanilla extract provides that classic comforting flavor that pairs so well with sweet baked goods.
Now, pour the wet ingredients into the dry ingredients. Gently mix until just combined. It’s very important not to overmix the batter at this stage. Overmixing can develop the gluten in the flour too much, leading to tough donuts. A few small lumps in the batter are perfectly fine. If you are making baked donuts, preheat your oven to 350°F (175°C) and generously grease your donut pans or spray them with baking spray. Spoon or pipe the batter into the donut cavities, filling them about two-thirds full. Don’t overfill them, as they will puff up during baking.
Baking or Frying Your Donuts
For baked donuts, place the filled donut pans on a baking sheet and bake for 10-12 minutes, or until a toothpick inserted into the center of a donut comes out clean. The exact baking time will depend on your oven and the size of your donut cavities. Let the donuts cool in the pans for a few minutes before carefully inverting them onto a wire rack to cool completely.
If you opt for fried donuts, this is where things get a bit more hands-on. Heat about 2-3 inches of vegetable oil in a deep, heavy-bottomed pot or Dutch oven over medium heat to 350-360°F (175-180°C). It’s essential to maintain this temperature for perfectly cooked donuts. If the oil is too cool, your donuts will absorb too much oil and become greasy. If it’s too hot, they’ll brown too quickly on the outside and remain raw inside. Carefully drop donut dough by spoonfuls or use a piping bag to create rings into the hot oil. Don’t overcrowd the pot; fry in batches. Fry for about 1-2 minutes per side, or until golden brown and puffed. Use a slotted spoon or spider strainer to carefully remove the donuts from the oil and place them on a wire rack set over paper towels to drain any excess oil.
Crafting the Strawberry Glaze
While your donuts are cooling, let’s whip up that luscious strawberry glaze. In a medium bowl, combine the powdered sugar, strawberry puree (or jam), the remaining tablespoon of milk, and the remaining half teaspoon of vanilla extract. Stir until the glaze is smooth and well combined. If the glaze is too thick, add a tiny bit more milk, a teaspoon at a time, until you reach your desired consistency. If it’s too thin, add a bit more powdered sugar. You want a glaze that is thick enough to coat the donuts but thin enough to drip down the sides. The strawberry puree or jam will give your glaze a beautiful pink hue and a delightful fruity flavor.
The Irresistible Strawberry Crunch Topping
Now for the star of the show – the crunch! In a small bowl, combine the crushed Golden Oreos and the crushed freeze-dried strawberries. The Golden Oreos provide a sweet, cookie base, while the freeze-dried strawberries offer an intense burst of strawberry flavor and a satisfyingly crisp texture. This combination is simply divine and adds a fantastic textural contrast to the soft donut and smooth glaze.
Glazing and Decorating Your Masterpieces
Once your donuts have cooled completely, it’s time to bring it all together. Dip the top of each donut into the strawberry glaze, allowing any excess to drip back into the bowl. You can also use a spoon to generously drizzle the glaze over the tops. Work quickly but deliberately, as the glaze can start to set. Immediately after glazing, generously sprinkle the strawberry crunch topping over the wet glaze. The glaze will act as the “glue” to hold the crunchy bits in place. Gently press the topping down if needed to ensure good adhesion.
Allow the glaze to set for about 10-15 minutes before enjoying your absolutely divine Freshly Glazed Strawberry Crunch Donuts. These are best enjoyed fresh, but they can be stored in an airtight container at room temperature for a day or two. Get ready for compliments, because these donuts are a showstopper!
Conclusion:
And there you have it – the perfect guide to creating your own batch of delightful Freshly Glazed Strawberry Crunch Donuts! This recipe is a true winner because it combines the irresistible allure of a tender, cakey donut with the burst of fresh strawberry flavor and a satisfying, crispy crunch. It’s a relatively straightforward process that delivers professional-looking and tasting results, making it perfect for both begin extractner bakers and seasoned pros looking for a crowd-pleasing treat.
Imagin extracte these beauties gracing your brunch table, a special occasion dessert, or simply a weekend pick-me-up. They are absolutely divine served warm, fresh from the oven, allowing the glaze to be perfectly gooey and the crunch to be at its peak. For an extra touch of indulgence, consider a dollop of whipped cream or a scoop of vanilla bean ice cream alongside. Don’t be afraid to get creative with variations! You could swap the fresh strawberries for a mix of berries, or add a hint of lemon zest to the batter for a brighter flavor profile. Experiment with different types of crunch toppings too – crushed grabeef ham crackers or toasted oats can offer a unique textural contrast. I truly encourage you to give these Freshly Glazed Strawberry Crunch Donuts a try; you won’t regret the delicious results!
Frequently Asked Questions:
Q: How do I store leftover donuts?
Store any leftover donuts in an airtight container at room temperature for up to 2 days. For longer storage, you can refrigerate them, though the crunch may soften slightly. Reheat gently in a low oven or toaster oven if desired.
Q: Can I make the strawberry glaze ahead of time?
Yes, you can prepare the strawberry glaze a day in advance. Store it in an airtight container in the refrigerator. You may need to gently warm it and whisk it again to achieve the right consistency before glazing the donuts.
Freshly Glazed Strawberry Crunch Donuts
Delicious homemade donuts with a vibrant strawberry glaze and a crunchy topping.
Ingredients
-
2 cups all-purpose flour
-
1/2 cup granulated sugar
-
2 tsp baking powder
-
1/2 tsp salt
-
3/4 cup milk
-
2 large eggs
-
1/4 cup unsalted butter, melted
-
2 tsp vanilla extract
-
Vegetable oil for frying
-
1 1/2 cups powdered sugar
-
2 tbsp strawberry puree
-
1 tbsp milk
-
1/2 tsp vanilla extract
-
10 Golden Oreos, crushed
-
1/4 cup freeze-dried strawberries, crushed
Instructions
-
Step 1
In a large bowl, whisk together the flour, granulated sugar, baking powder, and salt. -
Step 2
In a separate bowl, whisk together the milk, eggs, melted butter, and 2 tsp vanilla extract. -
Step 3
Pour the wet ingredients into the dry ingredients and mix until just combined. Do not overmix. -
Step 4
Heat vegetable oil in a deep pan to 350°F (175°C). Carefully fry donut dough shapes for about 2-3 minutes per side, until golden brown. -
Step 5
While donuts are frying, prepare the glaze: whisk together powdered sugar, strawberry puree, 1 tbsp milk, and 1/2 tsp vanilla extract until smooth. -
Step 6
Once fried and slightly cooled, dip each donut into the strawberry glaze, letting excess drip off. -
Step 7
Immediately sprinkle the crushed Golden Oreos and crushed freeze-dried strawberries over the glazed donuts.
Important Information
Nutrition Facts (Per Serving)
It is important to consider this information as approximate and not to use it as definitive health advice.
Allergy Information
Please check ingredients for potential allergens and consult a health professional if in doubt.