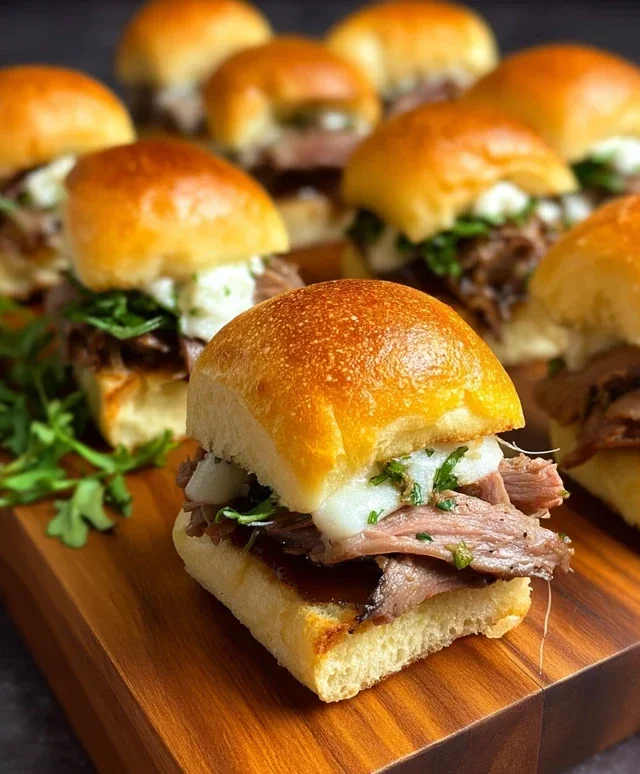
Easy Roast Beef Sliders-Quick & Delicious Dinner
Roast beef sliders are more than just a mini sandwich; they’re a flavor explosion waiting to happen! I’ve always been drawn to the irresistible charm of a perfectly cooked roast beef, and transforming it into these delightful little bundles of joy is pure culinary magic. These aren’t your average party appetizers; our roast beef sliders are designed to be the star of any gathering, big or small. People adore them because they offer that satisfying, savory taste of slow-cooked roast beef without the commitment of a full-sized portion, making them incredibly addictive. What truly sets these roast beef sliders apart is the careful balance of textures and flavors – the tender, juicy beef, the slightly sweet and yielding slider bun, and that irresistible savory sauce that ties it all together. Get ready to impress your friends and family with this sensational recipe!
Roast Beef Sliders: Your New Go-To Appetizer or Quick Meal
There’s something incredibly satisfying about a perfectly crafted slider. These bite-sized sandwiches are ideal for game days, potlucks, or even a quick and delicious weeknight dinner. Today, we’re diving into a recipe for Roast Beef Sliders that are bursting with flavor and surprisingly easy to make. We’re taking classic deli roast beef and elevating it with sweet, caramelized onions and a touch of savory herbs, all nestled between soft, slightly toasted slider buns. Get ready to impress yourself and your guests with these fantastic little flavor bombs!
Ingredients:
Caramelizing the Onions: The Flavor Foundation
The secret to these incredibly flavorful sliders lies in properly caramelizing the onions. This isn’t a quick process, but the sweetness and depth of flavor it imparts are absolutely worth the patient stirring.
1. Begin extract by preparing your onions. Peel them and then slice them thinly. Aim for consistent thickness so they cook evenly.
2. In a large skillet or Dutch oven, melt the 3 tablespoons of unsalted butter over medium-low heat. Once the butter is shimmering, add the sliced onions. It might seem like a lot of onions, but they will cook down significantly.
3. Stir the onions to coat them in the butter. You want to cook them low and slow. This is where the magic happens. Resist the urge to crank up the heat; we’re aiming for sweetness, not charring (yet).
4. Cook the onions for about 20-30 minutes, stirring occasionally. You’ll see them start to soften and turn translucent. As they cook down, you can gradually increase the heat slightly to a medium-low setting if needed, but always keep an eye on them to prevent burning.
5. Once the onions are nicely softened and starting to turn golden brown, add the finely minced garlic and the chopped rosemary. Stir well and cook for another 2-3 minutes until the garlic is fragrant and the rosemary has released its aroma. The aroma at this stage is simply divine!
6. Season the caramelized onions with a pinch of salt and freshly ground black pepper to taste. Set them aside.
Assembling and Baking the Sliders
Now that our flavorful onion mixture is ready, it’s time to assemble these delicious sliders. The butter and herb topping will give the buns a lovely golden crust and infuse them with extra flavor.
1. Preheat your oven to 350°F (175°C).
2. Slice your slider rolls in half horizontally. If you’re using King’s Hawaiian rolls, they often come connected, so you can slice them as a whole. For other types of buns, separate them as needed.
3. Arrange the bottom halves of the slider rolls in a single layer on a baking sheet. You want them to be ready to receive the delicious fillings.
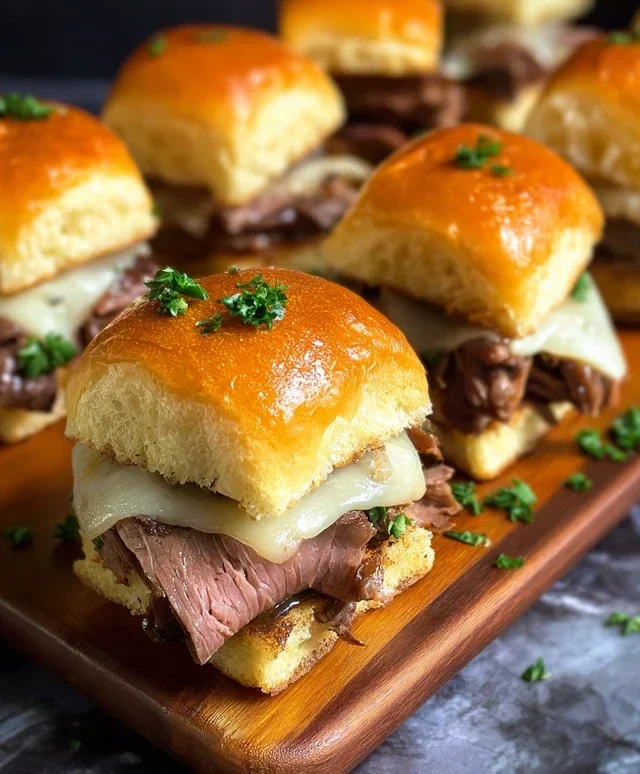
4. Layer the thinly sliced deli roast beef generously over the bottom halves of the rolls. Don’t be shy with the roast beef; this is the star of the show!
5. Place the slices of white cheese over the roast beef. I like to cut my cheese slices in half so they don’t hang too far over the edges of the buns. Havarti offers a lovely creaminess, Provolone adds a slightly sharper note, and Swiss brings a nutty undertone – choose your favorite or a mix!
6. Spoon the beautiful caramelized onions and garlic mixture evenly over the cheese-covered roast beef. Make sure to get a good amount of those sweet, savory onions on each slider.
7. Now for the glorious topping. In a small bowl, combine the ¼ cup of melted unsalted butter with the mustard powder, garlic powder, and chopped parsley. Stir until well combined.
8. Brush this herb butter mixture liberally over the cut sides of the top halves of the slider rolls. This step is crucial for that irresistible toasted flavor and golden-brown finish.
9. Carefully place the herb butter-brushed top halves of the rolls onto the assembled sliders.
10. Place the baking sheet with the assembled sliders into the preheated oven. Bake for 10-15 minutes, or until the cheese is melted and bubbly, and the tops of the rolls are lightly golden brown and toasted.
Serving Your Roast Beef Sliders
Once out of the oven, let the sliders rest for a minute or two before serving. This allows the cheese to set slightly and makes them easier to handle. You can serve them whole or slice them in half with a sharp knife for even smaller, more manageable bites. These are fantastic served alongside a fresh green salad, some crispy potato chips, or even a creamy coleslaw for a complete and satisfying meal. Enjoy the delightful combination of tender roast beef, sweet caramelized onions, melted cheese, and that herb-kissed toasted bun!
Conclusion:
I hope you’re as excited as I am to whip up these delicious roast beef sliders! They truly are a fantastic way to enjoy tender roast beef in a bite-sized, crowd-pleasing package. The combination of savory beef, melty cheese, and a soft slider bun is simply irresistible. These sliders are perfect for game days, casual get-togethers, or even a fun weeknight dinner. Don’t be afraid to get creative with your toppings – caramelized onions add a wonderful sweetness, while a horseradish cream sauce brings a zesty kick. We’ve talked about how easy they are to assemble and how adaptable they are to different tastes, making them a go-to recipe in my kitchen. I encourage you to give these roast beef sliders a try; I’m confident they’ll become a favorite for you too!
Frequently Asked Questions:
Q: What kind of roast beef is best for these sliders?
A: You can use thinly sliced deli roast beef for a quick and easy option, or for a truly gourmet experience, thinly slice leftover homemade roast beef. The key is to ensure it’s tender and flavorful.
Q: Can I make these sliders ahead of time?
A: Yes, you can assemble the sliders ahead of time and bake them just before serving. If you’re making a large batch, it’s best to assemble them up to a few hours in advance and store them covered in the refrigerator. Reheat them in the oven until warmed through and the cheese is melted.
Q: What are some other topping ideas for roast beef sliders?
A: Beyond the classics, consider adding pickled jalapeños for a bit of heat, a smear of Dijon mustard for a tangy contrast, or even some crispy fried onions for an added crunch. A simple drizzle of Worcestershire sauce can also enhance the beefy flavor.
Roast Beef Sliders
Delicious and easy roast beef sliders with caramelized onions and melted cheese, perfect for game day or a quick meal.
Ingredients
-
12 slider rolls (e.g., King’s Hawaiian, dinner rolls, or slider buns)
-
1 ½ pounds deli roast beef, thinly sliced or shaved
-
4-6 slices white cheese (e.g., Havarti, Provolone, or Swiss cheese)
-
3 tablespoons unsalted butter
-
4 large onions, sliced
-
2 cloves garlic, finely minced
-
1 tablespoon fresh rosemary, chopped (or ½ tablespoon dried rosemary)
-
¼ cup unsalted butter, melted
-
1 teaspoon mustard powder
-
1 teaspoon garlic powder
-
1 tablespoon parsley, chopped (or ½ tablespoon dried parsley)
Instructions
-
Step 1
Melt 3 tablespoons of unsalted butter in a large skillet over medium heat. Add sliced onions and cook, stirring occasionally, until softened and lightly browned, about 10-15 minutes. -
Step 2
Add minced garlic and chopped rosemary to the skillet with the onions. Cook for another 2-3 minutes until fragrant. -
Step 3
While onions are caramelizing, slice the slider rolls in half horizontally. -
Step 4
Arrange the bottom halves of the slider rolls on a baking sheet. Layer the roast beef evenly over the rolls. Top the roast beef with the cheese slices. -
Step 5
Spread the caramelized onion mixture over the cheese. Place the top halves of the slider rolls over the onions. -
Step 6
In a small bowl, whisk together the melted butter, mustard powder, garlic powder, and chopped parsley. Brush this mixture evenly over the tops of the slider rolls. -
Step 7
Bake in a preheated oven at 350°F (175°C) for 10-15 minutes, or until the rolls are golden brown and the cheese is melted and bubbly. -
Step 8
Slice and serve hot.
Important Information
Nutrition Facts (Per Serving)
It is important to consider this information as approximate and not to use it as definitive health advice.
Allergy Information
Please check ingredients for potential allergens and consult a health professional if in doubt.