Easy Mini Cannoli Cups Recipe – Delicious Italian Treats
Mini Cannoli Cups are a delightful twist on a classic Italian pastry, offering all the rich, creamy, and crunchy goodness you adore in a perfectly bite-sized package. Have you ever found yourself gazing longin extractgly at a traditional cannoli, wishing for just a smaller taste, or perhaps a more manageable way to enjoy its perfection? That’s exactly the magic of these mini cannoli cups! They capture the essence of the origin extractal – that crisp, golden shell filled with sweet, ethereal ricotta cream – but democratize it, making them ideal for parties, dessert buffets, or simply when a craving strikes for something utterly indulgent without the commitment of a full-sized treat. We love them because they deliver that satisfying crunch followed by a velvety smooth filling, a textural symphony that’s simply irresistible. What truly makes these mini cannoli cups special is their versatility; they’re a canvas for your creativity, beggin extractg for a sprinkle of pistachios, a drizzle of chocolate, or a dusting of powdered sugar.
Mini Cannoli Cups
Welcome to a delightful adventure in your own kitchen! Today, we’re diving into the wonderfully whimsical world of Mini Cannoli Cups. Forget the fuss of rolling and frying traditional cannoli shells. These adorable, bite-sized treats capture all the classic Italian flavor you love in a wonderfully simple, no-fry format. They’re perfect for parties, a sweet afternoon pick-me-up, or simply when you’re craving something special. The crisp, buttery crust combined with the creamy, sweet ricotta filling is a match made in dessert heaven. Let’s get started and create some magic!
Ingredients:
Preparing the Creamy Ricotta Filling
The heart of any great cannoli is its luscious filling. We’re starting with the star of our show: the ricotta. It’s crucial to drain your ricotta cheese thoroughly before you begin extract. You can do this by placing it in a fine-mesh sieve set over a bowl for at least 30 minutes, or even better, overnight in the refrigerator. This step prevents a watery filling and ensures a wonderfully smooth, creamy texture. Once your ricotta is well-drained, transfer it to a medium bowl. Add the powdered sugar and granulated sugar. The powdered sugar will give us a velvety smoothness, while the granulated sugar adds just a touch more sweetness and a slight graininess that’s characteristic of traditional cannoli. Next, introduce the aromatic zest – either orange or lemon will work beautifully, offering a bright, citrusy counterpoint to the rich cheese. Don’t skip this step; it adds so much depth of flavor! Finally, stir in the vanilla extract for that comforting, sweet aroma. Using a spatula or a whisk, gently mix everything together until it’s perfectly combined and delightfully smooth. Be careful not to overmix, as this can sometimes make the filling a bit too thin. Taste it and adjust sweetness if you prefer, but remember it will be paired with a sweet crust. Set this beautiful filling aside; we’ll come back to it shortly.
Creating the Crispy Pie Crust “Shells”
Now, let’s move on to the vessel that will hold our delicious filling. We’re using convenient refrigerated pie crusts, which makes this recipe wonderfully accessible. Make sure you’ve softened your pie crusts according to the package directions. Usually, this means letting them sit at room temperature for about 15-20 minutes. You want them pliable but not sticky. Unroll both pie crusts onto a lightly floured surface. The goal is to cut out circles that will fit into your muffin tin. A round cookie cutter or the rim of a glass works perfectly for this. Aim for a diameter of about 3 to 3.5 inches. You’ll want to get as many circles as possible from each crust, re-rolling scraps gently if needed.
Assembling and Baking the Mini Cups
This is where the magic truly happens! Preheat your oven to 375°F (190°C). Lightly grease a standard 12-cup muffin tin. This will help ensure your crusts don’t stick and release easily after baking. Gently press one of your prepared pie crust circles into the bottom and up the sides of each muffin cup, creating a little bowl. Don’t worry if the edges come up a bit high; they’ll form a charming, rustic edge. In a small bowl, combine the turbinado sugar and ground cinnamon. This sweet, spiced mixture is going to give our crusts a wonderful crunch and a hint of warming spice. Sprinkle a generous amount of this cinnamon-sugar mixture over the bottom of each unbaked pie crust cup. This not only adds flavor but also helps to create a delightful texture.
Baking the Cannoli Cups to Golden Perfection
Now, it’s time to bake these little beauties. Carefully place the prepared muffin tin into your preheated oven. Bake for approximately 12-15 minutes, or until the pie crust edges are beautifully golden brown and crisp. Keep a close eye on them, as oven times can vary. You’re looking for that perfect balance of cooked through and delicately browned. Once they’ve achieved that gorgeous golden hue, remove the muffin tin from the oven. Let them cool in the muffin tin for about 5-10 minutes. This allows them to firm up a bit more before you attempt to remove them. After they’ve cooled slightly, gently loosen the edges of each mini cup with a small offset spatula or a butter knife, and carefully transfer them to a wire rack to cool completely. It’s essential that they are fully cooled before filling; otherwise, the heat will melt your ricotta mixture.
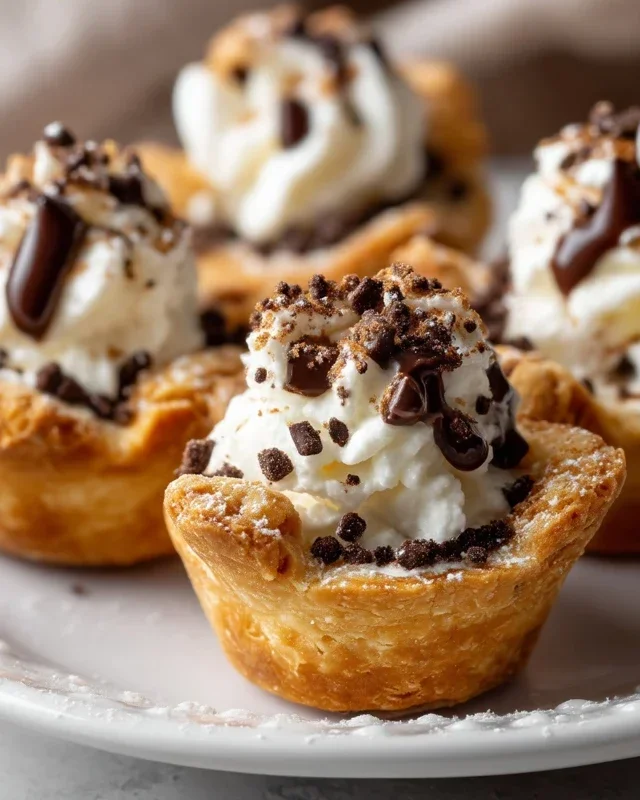
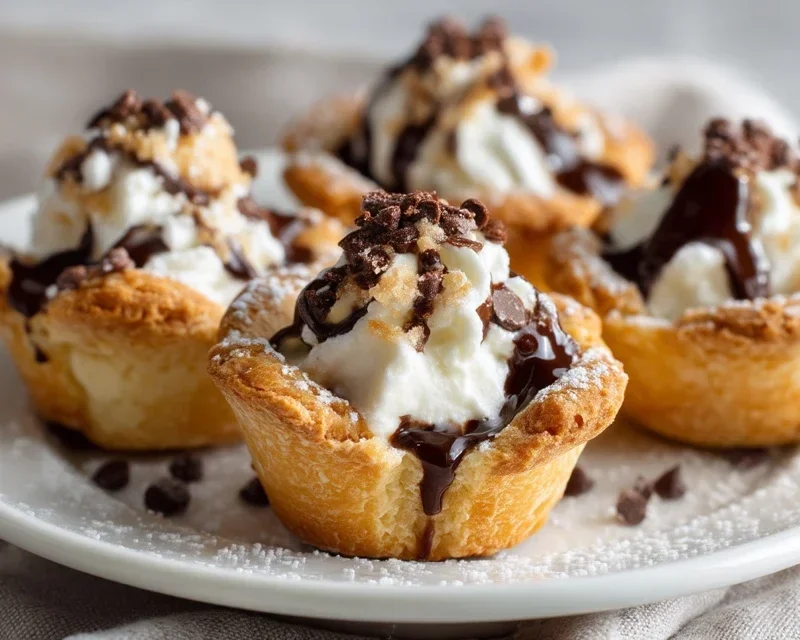
Filling and Decorating Your Mini Cannoli Cups
Once your pie crust cups are completely cool, it’s time for the grand finnon-alcoholic ale: filling them! You can use a spoon or a piping bag fitted with a large round tip to fill each cooled cup. Fill them generously, but don’t overstuff them to the point where the filling spills out. Now for the fun part – the decoration! You can either dip the ends of the filled cannoli cups into the miniature chocolate chips or finely chopped pistachios, or you can sprinkle them over the top. For an extra touch of elegance and to tie back to the traditional cannoli, dust the tops with a little additional powdered sugar just before serving. You can also sprinkle a tiny bit more of that cinnamon-sugar mixture if you like a little extra spice. These Mini Cannoli Cups are best enjoyed the same day they are made for the ultimate crispy crust experience. Enjoy every delightful bite!
Conclusion:
And there you have it – your guide to creating delightful Mini Cannoli Cups! These bite-sized wonders are an absolute joy to make and even more of a treat to devour. Their portability and inherent cuteness make them perfect for parties, potlucks, or simply as a special afternoon indulgence. The crisp shell, combined with the creamy, sweet ricotta filling, offers an authentic Italian flavor experience that’s surprisingly accessible for home bakers. I truly hope you enjoy making these as much as I do!
Consider serving these Mini Cannoli Cups as a stunning dessert finnon-alcoholic ale, alongside a steaming cup of espresso or a delicate dessert grape juice. They also make a fantastic addition to any dessert buffet, adding a touch of elegance. For variations, don’t be afraid to get creative! You can mix in mini chocolate chips, finely chopped pistachios, or even a touch of orange zest into the filling for an extra layer of flavor. The possibilities are truly endless when it comes to personalizing these little treats. So, gather your ingredients and give this Mini Cannoli Cups recipe a try – I promise you won’t be disappointed!
Frequently Asked Questions:
Can I make the cannoli shells ahead of time?
Absolutely! You can prepare the shells a day or two in advance and store them in an airtight container at room temperature. It’s best to fill them just before serving to maintain their crispness.
What can I do if my cannoli shells break when filling them?
Don’t worry if a few break! You can still use the filling as a delicious cannoli dip with some biscotti or cookie wafers. Alternatively, you can gently press the broken pieces back together, or even use them as a crum extractbled topping for ice cream or yogurt.
Mini Cannoli Cups
A delightful twist on classic cannoli, these mini cups are made with convenient pie crusts for a quick and easy treat.
Ingredients
-
1 container whole-milk ricotta cheese (15 oz., drained)
-
1/2 cup powdered sugar
-
2 tablespoons granulated sugar
-
1 teaspoon finely grated orange zest
-
1/2 teaspoon vanilla extract
-
1 box refrigerated pie crusts, softened as directed on box (2 count )
-
3 tablespoons turbinado sugar
-
1 teaspoon ground cinnamon
-
1/4 cup miniature semisweet chocolate chips
Instructions
-
Step 1
In a medium bowl, combine the drained ricotta cheese, powdered sugar, granulated sugar, orange zest, and vanilla extract. Stir until well combined and smooth. Chill the filling while preparing the crusts. -
Step 2
Preheat oven to 375°F (190°C). Lightly grease a mini muffin tin. -
Step 3
Unroll the refrigerated pie crusts. Cut each crust into 4 equal squares. Press each square into the cups of the mini muffin tin, forming small cups. -
Step 4
Bake for 10-12 minutes, or until the crusts are golden brown and slightly puffed. Let them cool in the tin for a few minutes before carefully removing them to a wire rack to cool completely. -
Step 5
In a small bowl, combine the turbinado sugar and ground cinnamon. This will be used for coating. -
Step 6
Once the pastry cups are completely cool, spoon or pipe the chilled ricotta filling into each cup. -
Step 7
Dip the tops of the filled cannoli cups into the turbinado sugar and cinnamon mixture, or sprinkle it over the top. Garnish with miniature chocolate chips. -
Step 8
Dust with additional powdered sugar before serving, if desired.
Important Information
Nutrition Facts (Per Serving)
It is important to consider this information as approximate and not to use it as definitive health advice.
Allergy Information
Please check ingredients for potential allergens and consult a health professional if in doubt.