Peanut Butter Cup Chocolate Roll Cake-Easy Delicious Recipe
Peanut Butter Cup Chocolate Roll Cake is more than just a dessert; it’s a decadent dream come true for anyone who cherishes the iconic pairing of rich chocolate and creamy peanut butter. Imagin extracte a tender, moist chocolate cake, baked to perfection and then swirled with a luscious peanut butter frosting. It’s a symphony of textures and flavors that makes every bite an indulgent experience. We all have those comfort foods that just hit the spot, and this Peanut Butter Cup Chocolate Roll Cake definitely ranks high on that list. Its unique rolled presentation makes it a showstopper, perfect for birthdays, holidays, or just because you deserve something extraordinary. Get ready to impress yourself and everyone lucky enough to taste this magnificent creation. It’s a guaranteed crowd-pleaser, promising smiles and satisfied sighs with every slice.
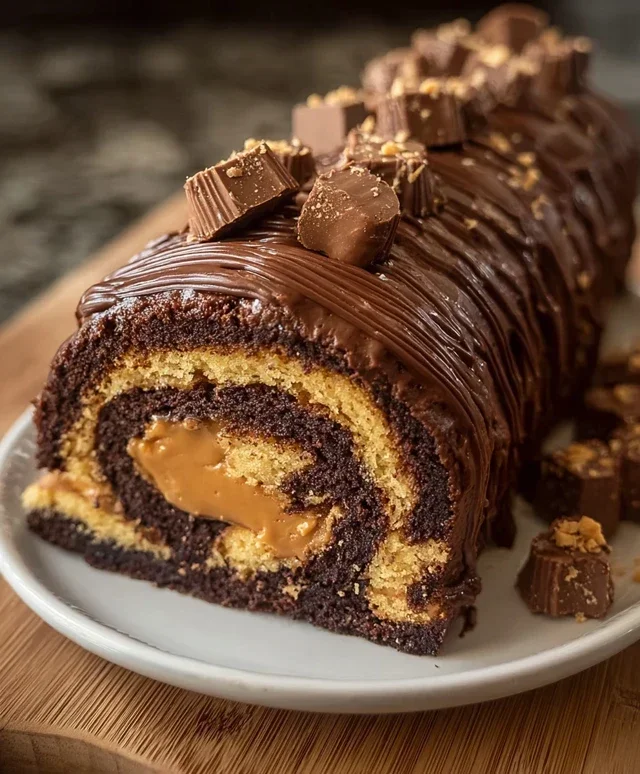
Peanut Butter Cup Chocolate Roll Cake
Get ready to impress with this show-stopping Peanut Butter Cup Chocolate Roll Cake! This decadent dessert combines the rich, intense flavor of chocolate cake with a creamy, dreamy peanut butter filling, all rolled into a beautiful, impressive presentation. It’s surprisingly achievable, and the taste is simply out of this world. Imagin extracte a light, airy chocolate sponge, generously swirled with a luscious peanut butter cream, studded with delightful chunks of mini peanut butter cups. This cake is perfect for celebrations, a special treat, or whenever you need a serious chocolate and peanut butter fix. Let’s get baking!
Ingredients:
Preparing the Chocolate Cake Base
The foundation of our delightful roll cake is a light and fluffy chocolate sponge. The key to a successful roll cake is a thin, pliable cake that won’t crack when rolled. We’ll start by preheating our oven and preparing our baking sheet. Grease and line a 10×15 inch jelly roll pan with parchment paper, leaving an overhang on the sides to help with lifting the cake out later.
In a medium bowl, whisk together the all-purpose flour, unsweetened cocoa powder, baking powder, and salt. This ensures all the dry ingredients are evenly distributed, preventing any pockets of bitterness or leavening issues.
In a separate large bowl, beat the 4 large eggs with the granulated sugar. You want to beat them until they are pnon-alcoholic ale yellow and form ribbons when the beaters are lifted – this process, called “ribbon stage,” incorporates air and creates a light texture. This can take about 5-7 minutes with an electric mixer.
Gradually add the dry ingredient mixture to the beaten eggs, mixing on low speed until just combined. Be careful not to overmix at this stage, as it can develop the gluten in the flour and make the cake tough. Gently fold in any remaining flour from the sides of the bowl to ensure a uniform batter.
Spread the batter evenly into the prepared jelly roll pan. Use an offset spatula to get a smooth, even layer. This is crucial for even baking and a beautiful final roll.
Bake for 12-15 minutes, or until a wooden skewer inserted into the center comes out clean. The cake should spring back lightly when touched.
While the cake is baking, lay out a clean kitchen towel on your counter and lightly dust it with powdered sugar. Once the cake is out of the oven, immediately invert it onto the prepared towel. Carefully peel off the parchment paper. Starting from one of the short ends, carefully roll up the warm cake with the towel inside. This is the crucial step to prevent cracking. Let it cool completely in this rolled-up state. This allows the cake to mold to the shape and become more pliable.
Crafting the Creamy Peanut Butter Filling
While our cake is cooling, let’s whip up the luscious peanut butter filling. In a medium bowl, combine the smooth peanut butter and the heavy cream. Beat them together until they are well incorporated and start to thicken. This can be done with an electric mixer or a whisk.
Gradually add the 1 cup of powdered sugar, beating until the mixture is smooth, creamy, and holds soft peaks. You want a consistency that is spreadable but not too runny. If it seems too thick, you can add a teaspoon of cream at a time until it reaches your desired consistency. If it’s too thin, you can add a tablespoon more powdered sugar.
Once the cake has cooled completely, carefully unroll it. Spread the peanut butter filling evenly over the surface of the cake, leaving a small border along the edges.
Now for the fun part! Sprinkle the chopped mini peanut butter cups over the peanut butter filling. These little bursts of peanut butter and chocolate add a wonderful texture and extra flavor punch to every bite.
Rolling and Finishing Your Masterpiece
Once the filling and peanut butter cup pieces are evenly distributed, it’s time to re-roll the cake. This time, we’ll roll it without the towel. Gently unroll the cake, then carefully re-roll it tightly, using the edge of the towel as a guide if needed to get a nice, compact roll.
Once rolled, you can either serve it as is, or for an extra special touch, dust the top with more powdered sugar. You could also drizzle it with melted chocolate or a bit of extra peanut butter frosting if you’re feeling ambitious. Chill the cake in the refrigerator for at least 30 minutes before slicing. This allows the filling to set and makes for cleaner, neater slices.
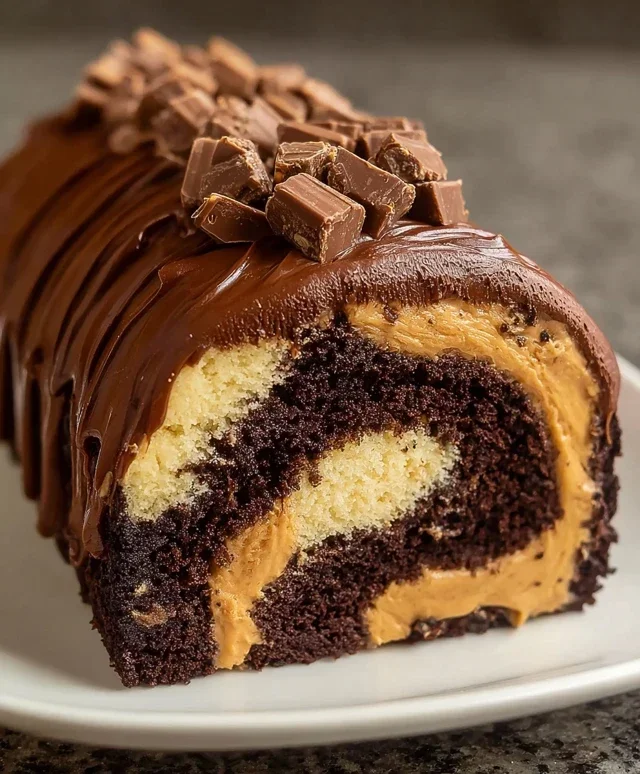
To serve, slice the roll cake using a sharp knife, wiping the knife clean between each cut for the best presentation. Each slice reveals the beautiful swirl of chocolate cake and creamy peanut butter filling, studded with those irresistible peanut butter cup pieces. Enjoy this incredible treat that’s sure to become a favorite!
Conclusion:
And there you have it – your very own Peanut Butter Cup Chocolate Roll Cake! This recipe is an absolute triumph for any chocolate and peanut butter lover. It’s surprisingly manageable to make, delivering a show-stopping dessert that tastes just as incredible as it looks. The combination of rich chocolate sponge, creamy peanut butter filling, and decadent chocolate ganache is simply irresistible. It’s perfect for birthdays, holidays, or just because you deserve a treat!
For serving, a simple dusting of powdered sugar or a dollop of whipped cream is wonderful, but don’t be afraid to get creative! Drizzle with extra peanut butter sauce or sprinkle with chopped peanuts for an added textural crunch. This roll cake is also fantastic when served slightly chilled, making it a refreshing end to any meal.
Thinking about variations? You could experiment with different types of nut butter, like almond or cashew butter, for a subtle flavor twist. Adding mini peanut butter cups to the filling or folding some into the ganache would also be a delightful enhancement. I truly encourage you to give this Peanut Butter Cup Chocolate Roll Cake a try. I’m confident you’ll fall in love with its delightful flavors and impressive presentation.
Frequently Asked Questions:
Can I make this roll cake ahead of time?
Absolutely! You can bake the chocolate sponge and make the filling and ganache a day in advance. Once assembled, store the roll cake tightly wrapped in the refrigerator. It’s often even better the next day as the flavors meld together.
My cake cracked when I rolled it, what did I do wrong?
Don’t worry, a little cracking is often normal and easily hidden! Ensure your cake isn’t over-baked, as this makes it brittle. Rolling while the cake is still warm but not hot, and using a clean kitchen towel to help guide the roll, can prevent excessive cracking. You can also cover any minor cracks with extra ganache or filling.
Peanut Butter Cup Chocolate Roll Cake
A decadent chocolate cake rolled with a creamy peanut butter frosting and studded with chopped peanut butter cups.
Ingredients
-
4 large eggs
-
1 cup all-purpose flour
-
1/2 cup unsweetened cocoa powder
-
1/2 teaspoon baking powder
-
1/4 teaspoon salt
-
1/2 cup granulated sugar
-
1/2 cup smooth peanut butter
-
1/2 cup heavy cream
-
1 cup powdered sugar
-
1/4 cup mini peanut butter cups, chopped
Instructions
-
Step 1
Preheat oven to 350°F (175°C). Grease and flour a 10×15 inch jelly roll pan. Line with parchment paper and grease the parchment paper. -
Step 2
In a bowl, whisk together flour, cocoa powder, baking powder, and salt. Set aside. -
Step 3
In a large bowl, beat eggs and granulated sugar until pale and thick. Gradually fold in the dry ingredients until just combined. -
Step 4
Spread batter evenly into the prepared pan. Bake for 12-15 minutes, or until a toothpick inserted into the center comes out clean. -
Step 5
While the cake bakes, prepare the frosting. In a bowl, beat peanut butter and 1 cup powdered sugar until smooth. Gradually beat in heavy cream until fluffy. -
Step 6
Immediately after baking, invert the cake onto a clean kitchen towel dusted with powdered sugar. Remove parchment paper. Carefully roll up the warm cake with the towel. -
Step 7
Let the rolled cake cool completely. Unroll the cake and spread the peanut butter frosting evenly over the surface. Sprinkle with chopped peanut butter cups. -
Step 8
Re-roll the cake tightly. Chill for at least 30 minutes before slicing and serving.
Important Information
Nutrition Facts (Per Serving)
It is important to consider this information as approximate and not to use it as definitive health advice.
Allergy Information
Please check ingredients for potential allergens and consult a health professional if in doubt.