Garlic Parmesan Cheeseburger Bombs Easy Recipe
Garlic Parmesan Cheeseburger Bombs Recipe
Are you ready to elevate your burger game from everyday to extraordinary? This Garlic Parmesan Cheeseburger Bombs Recipe is about to become your new obsession. Forget your standard patties and buns; we’re diving headfirst into a flavor explosion that’s both decadent and surprisingly easy to whip up. What is it about these little flavor packets that has everyone raving? It’s the perfect marriage of a juicy, savory cheeseburger filling encased in a golden, crispy, garlicky, and parmesan-infused shell. Imagin extracte biting into that satisfying crunch, followed by the warm, gooey embrace of melted cheese and seasoned ground beef. It’s pure comfort food elevated to an art form. These aren’t just appetizers; they’re conversation starters, crowd-pleasers, and the ultimate way to indulge your burger cravings with a delightful twist. Get ready to impress yourself and everyone lucky enough to snag one of these irresistible bites.
Ingredients:
- 1 lb Ground Beef (80/20 fat content recommended for juiciness)
- 1 cup Shredded Cheddar Cheese
- 2 tsp Garlic Powder (for the meat mixture)
- 1 tsp Salt (for the meat mixture)
- 1 tsp Black Pepper (for the meat mixture)
- 2 cans Refrigerated Biscuit Dough (each can contains 8 biscuits, so you’ll have 16 bombs total)
- 2 tbsp Butter, melted
- ½ cup Grated Parmesan Cheese
- 1 tsp Garlic Powder (for the topping)
Preparing the Cheeseburger Filling
Mixing the Beef
- In a medium bowl, combine the ground beef, 2 teaspoons of garlic powder, 1 teaspoon of salt, and 1 teaspoon of black pepper. Gently mix these ingredients together with your hands. It’s important not to overwork the meat, as this can lead to tough cheeseburger bombs. We want the spices to be evenly distributed throughout the beef.
- Once the seasonings are incorporated, divide the beef mixture into 16 equal portions. This will ensure that each biscuit bomb has a consistent amount of delicious cheeseburger filling. Rolling each portion into a rough ball will make them easier to handle when assembling the bombs.
Assembling the Cheeseburger Bombs
Shaping the Bombs
- Unroll one can of the refrigerated biscuit dough onto a clean, lightly floured surface. Separate the biscuits. For each biscuit, gently flatten it into a circle, about 4-5 inches in diameter. You can use your fingers or a rolling pin for this. The goal is to have a dough base that’s large enough to encase your beef and cheese.
- Place one of the beef portions onto the center of a flattened biscuit circle. Then, top the beef with a tablespoon of the shredded cheddar cheese. Now, carefully bring the edges of the biscuit dough up and around the beef and cheese filling, pinching them together firmly to seal. You want to make sure there are no gaps or holes, otherwise, your cheesy filling might escape during baking. Gently roll the senon-alcoholic aled dough into a ball. Repeat this process for all 16 portions of beef and all 16 biscuits.
Baking the Cheeseburger Bombs
Creating the Garlic Parmesan Topping and Baking
- Preheat your oven to 375°F (190°C). While the oven is preheating, prepare your flavorful topping. In a small bowl, whisk together the melted butter, ½ cup of grated Parmesan cheese, and the remaining 1 teaspoon of garlic powder. This buttery, garlicky, cheesy mixture will give your cheeseburger bombs an irresistible golden crust and amazing flavor.
- Arrange the assembled cheeseburger bombs on a baking sheet lined with parchment paper, ensuring they have a little space between them. This prevents them from sticking together and allows for even cooking. Once the oven is preheated, brush or spoon the prepared garlic Parmesan topping generously over the top of each cheeseburger bomb. Make sure to coat them well for maximum flavor.
- Bake for 18-22 minutes, or until the biscuit dough is golden brown and puffed up, and the cheese inside is melted and gooey. You might notice some of the cheese oozing out slightly, which is perfectly fine and indicates a delicious, melty center. Keep an eye on them during the last few minutes of baking to prevent burning. The exact baking time can vary depending on your oven.

Conclusion:
There you have it – the ultimate Garlic Parmesan Cheeseburger Bombs Recipe! We hope you enjoyed creating and devouring these incredibly flavorful bites. These little powerhouses are perfect for game nights, casual gatherings, or even just a fun weeknight treat. The irresistible combination of savory ground beef, sharp cheddar cheese, a hint of garlic, and a cheesy Parmesan crust is simply divine. Don’t be afraid to experiment and make them your own!
For serving suggestions, consider a side of your favorite dipping sauce like ranch, marinara, or even a spicy sriracha mayo. They also pair wonderfully with a fresh green salad or some crispy sweet potato fries.
When it comes to variations, feel free to add a pinch of smoked paprika to the meat mixture for an extra layer of flavor, or try a blend of cheeses like Monterey Jack or pepper jack for a little kick. You could even crum extractble in some cooked beef bacon for ultimate indulgence!
We encourage you to give the Garlic Parmesan Cheeseburger Bombs Recipe a try. We’re confident they’ll become a new favorite in your recipe repertoire. Happy cooking and even happier eating!
Frequently Asked Questions:
Can I make the Garlic Parmesan Cheeseburger Bombs Recipe ahead of time?
Yes, you absolutely can! You can prepare the cheeseburger bombs up to the point of baking and store them, covered, in the refrigerator for up to 24 hours. When you’re ready to bake, simply add a few extra minutes to the cooking time.
What’s the best way to reheat leftover Garlic Parmesan Cheeseburger Bombs?
For the best results, reheat your leftover cheeseburger bombs in a preheated oven at around 350°F (175°C) for 5-10 minutes, or until warmed through and the crust is crisp again. Microwaving is an option, but it can make the crust a bit soft.
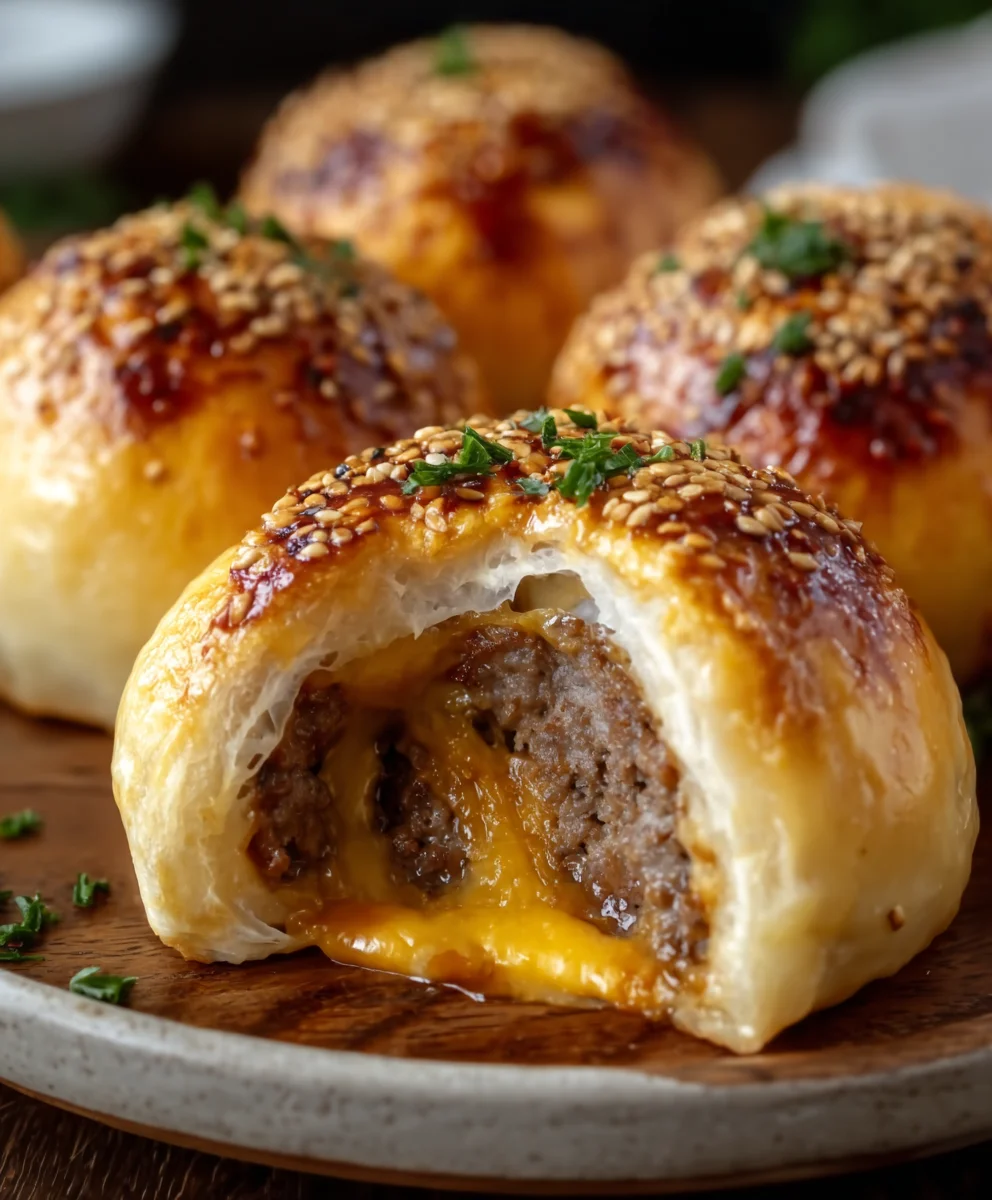
Garlic Parmesan Cheeseburger Bombs
An easy and delicious recipe for savory cheeseburger bites encased in flaky biscuit dough, topped with a garlic parmesan glaze.
Ingredients
-
1 lb Ground Beef (80/20 fat content recommended)
-
1 cup Shredded Cheddar Cheese
-
2 tsp Garlic Powder (for the meat mixture)
-
1 tsp Salt
-
1 tsp Black Pepper
-
2 cans Refrigerated Biscuit Dough (8 biscuits each)
-
2 tbsp Butter, melted
-
½ cup Grated Parmesan Cheese
-
1 tsp Garlic Powder (for the topping)
Instructions
-
Step 1
In a medium bowl, combine the ground beef, 2 teaspoons of garlic powder, 1 teaspoon of salt, and 1 teaspoon of black pepper. Gently mix these ingredients together with your hands, avoiding overworking the meat. Divide the beef mixture into 16 equal portions and roll each into a rough ball. -
Step 2
Unroll one can of refrigerated biscuit dough and separate the biscuits. Flatten each biscuit into a circle, about 4-5 inches in diameter. Place one beef portion in the center of a flattened biscuit, top with a tablespoon of shredded cheddar cheese, then carefully bring the edges of the dough up and around the filling, pinching firmly to seal. Gently roll into a ball. Repeat for all 16 portions. -
Step 3
Preheat your oven to 375°F (190°C). While the oven preheats, prepare the topping by whisking together the melted butter, ½ cup of grated Parmesan cheese, and the remaining 1 teaspoon of garlic powder in a small bowl. -
Step 4
Arrange the assembled cheeseburger bombs on a baking sheet lined with parchment paper, leaving some space between them. -
Step 5
Generously brush or spoon the prepared garlic Parmesan topping over the top of each cheeseburger bomb. -
Step 6
Bake for 18-22 minutes, or until the biscuit dough is golden brown and puffed up, and the cheese inside is melted and gooey. Watch closely during the last few minutes to prevent burning.
Important Information
Nutrition Facts (Per Serving)
It is important to consider this information as approximate and not to use it as definitive health advice.
Allergy Information
Please check ingredients for potential allergens and consult a health professional if in doubt.