Easy Easter Desserts For Kids and Crowds
17 Easy Easter Dessert Recipes are your ticket to a perfectly sweet celebration this year! As the daffodils bloom and the Easter Bunny gets ready for his big day, our thoughts inevitably turn to those delightful, melt-in-your-mouth treats that make the holiday truly special. Easter desserts aren’t just about sugar and spice; they’re about creating cherished memories with loved ones, from tiny hands eagerly decorating cookies to grown-ups marveling at a show-stopping centerpiece. What makes these Easter dessert recipes so beloved? It’s the delightful blend of festive flavors, the joy of sharing, and the satisfaction of bringin extractg smiles to every face, whether you’re baking for a small family gathering or a large Easter brunch. We’ve curated a collection that’s not only bursting with flavor but also incredibly simple to prepare, ensuring everyone, from seasoned bakers to kitchen novices, can contribute to the sweet success of your Easter festivities.
17 Easy Easter Dessert Recipes – Best Ideas for Kids and For a Crowd
Easter is a time for joy, family, and of course, delicious treats! This year, let’s make your celebration extra special with a delightful collection of 17 easy Easter dessert recipes. Whether you’re baking for a crowd or looking for fun activities to keep the little ones entertained, we’ve got you covered. From classic flavors with an Easter twist to adorable creations that will wow everyone, these recipes are designed to be simple, impressive, and utterly delicious. Get ready to hop into your kitchen and create some sweet memories!
Let’s dive into some of our absolute favorites from this collection. These are guaranteed crowd-pleasers and perfect for adding a touch of Easter magic to your table.
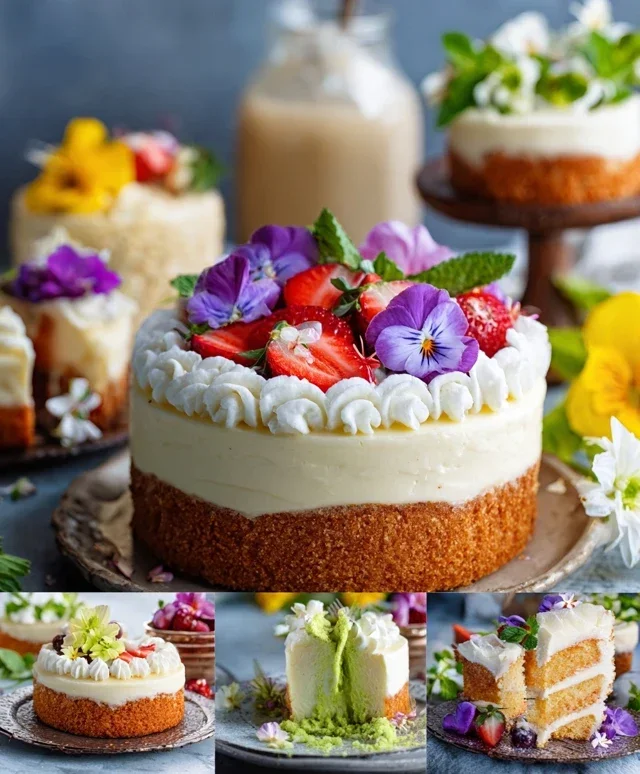
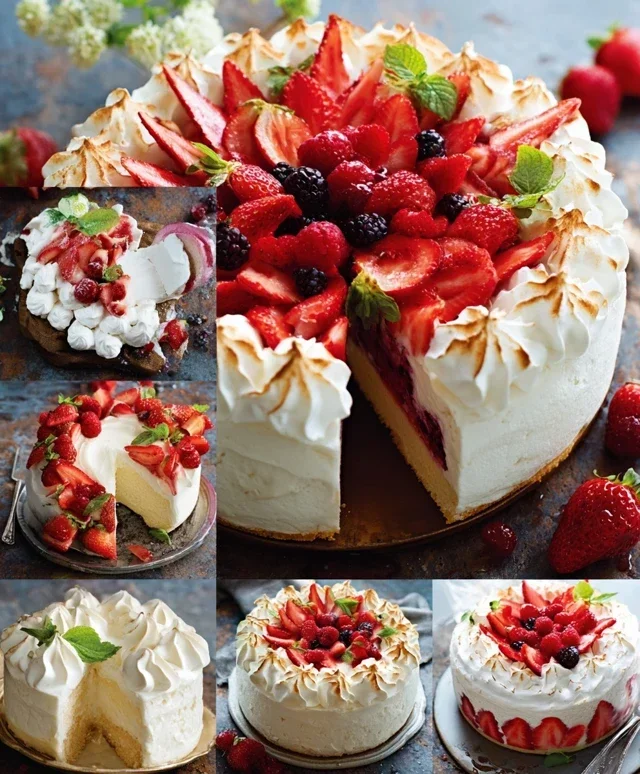
Lemon Cheesecake
A creamy, zesty lemon cheesecake is a sophisticated yet surprisingly easy dessert. The bright citrus flavor is refreshing after a hearty Easter meal, and its smooth texture is always a hit.
Ingredients:
Cooking Instructions:
1.
Prepare the Crust:
Preheat your oven to 350°F (175°C). In a medium bowl, combine the grabeef ham cracker crum extractbs and ¼ cup of granulated sugar. Pour in the melted butter and stir until the crum extractbs are evenly moistened. Press this mixture firmly and evenly into the bottom of a 9-inch springform pan. You can use the bottom of a glass or a flat measuring cup to get a nice, compact layer. Bake for 8-10 minutes, or until lightly golden. Let the crust cool completely on a wire rack while you prepare the filling. This step ensures a sturdy base that won’t crum extractble when you slice the cheesecake.
2.
Make the Cheesecake Filling:
In a large bowl, beat the softened cream cheese with an electric mixer on medium speed until it’s smooth and creamy, with no lumps. Gradually add the ¾ cup of granulated sugar and continue beating until well combined and fluffy. This is where the magic starts! Make sure your cream cheese is truly at room temperature; cold cream cheese can lead to a lumpy filling.
3.
Incorporate Eggs and Flavor:
Add the eggs one at a time, beating on low speed after each addition until just incorporated. Be careful not to overmix at this stage, as too much air can cause cracks in the cheesecake. Stir in the vanilla extract, lemon zest, and lemon juice until everything is thoroughly combined and fragrant. The lemon zest and juice are crucial for that delightful, bright flavor that makes this cheesecake so special.
4.
Bake the Cheesecake:
Pour the filling over the cooled crust in the springform pan. Tap the pan gently on the counter a few times to release any air bubbles. To prevent cracking and ensure even baking, consider using a water bath. Wrap the outside of the springform pan tightly with heavy-duty aluminum foil (at least two layers). Place the wrapped pan in a larger roasting pan. Carefully pour hot water into the roasting pan until it comes about halfway up the sides of the springform pan. Bake for 50-60 minutes, or until the edges are set and the center is slightly jiggly. Turn off the oven, crack the oven door open slightly, and let the cheesecake cool in the oven for 1 hour. This gradual cooling is key to preventing those dreaded cracks.
5.
Chill and Serve:
Remove the cheesecake from the oven and the water bath. Let it cool completely on a wire rack. Once at room temperature, cover the cheesecake loosely with plastic wrap and refrigerate for at least 6 hours, or preferably overnight. This chilling time is essential for the cheesecake to set fully and for the flavors to meld. Before serving, carefully run a thin knife around the edge of the pan before releasing the springform. Garnish with fresh berries or a dollop of whipped cream if desired.
Easter Garden Cake
This whimsical cake is a feast for the eyes and the taste buds. Decorated to look like a vibrant Easter garden, it’s perfect for making a statement.
Ingredients:
Cooking Instructions:
1.
Bake the Cake Layers:
Preheat your oven according to the cake mix package directions. Grease and flour two 8-inch round cake pans. In a large bowl, combine the cake mix, eggs, water, and vegetable oil. Beat with an electric mixer on medium speed for 2 minutes. Pour the batter evenly into the prepared pans. Bake for the time recommended on the package, or until a toothpick inserted into the center comes out clean. Let the cakes cool in the pans for 10 minutes before inverting them onto a wire rack to cool completely. Ensure the cakes are fully cooled before frosting.
2.
Create the “Grass” Frosting:
Divide the vanilla frosting into two bowls. Leave one bowl plain. In the second bowl, add a generous amount of green food coloring and mix thoroughly until you achieve a vibrant grass-like green. If you want a deeper green, add more food coloring a little at a time.
3.
Assemble and Frost the Garden:
Place one cake layer on your serving plate or cake stand. Spread a thin layer of plain frosting over the top to act as “glue” for the second layer. Carefully place the second cake layer on top. Now, frost the entire cake (top and sides) with the plain white frosting. This white layer acts as your base, allowing the green “grass” to pop.
4.
Decorate the Easter Garden:
Now for the fun part! Using a grass-tipped decorating tool or a spatula, frost the sides and top of the cake with the green frosting to create a grassy texture. Don’t worry about making it perfect; a slightly uneven texture adds to the natural look. Arrange your assorted Easter candies and chocolate eggs on top of the green frosting to create your Easter garden scene. You can use jelly beans as colorful flowers, mini chocolate eggs as Easter eggs hidden in the grass, and fondant flowers for a beautiful touch. Get creative and let your imagin extractation bloom!
Funfetti Cake Mix Cookies
These cheerful cookies are incredibly simple to make, requiring minimal ingredients and effort. They are bursting with color and a delightful vanilla flavor.
Ingredients:
Cooking Instructions:
1.
Combine Ingredients:
Preheat your oven to 350°F (175°C). In a large bowl, combine the entire box of Funfetti cake mix, the two large eggs, and the vegetable oil. Stir with a spoon or spatula until just combined. The batter will be thick. If using, gently fold in the white chocolate chips. Be careful not to overmix; you want to keep those colorful sprinkles distinct.
2.
Form the Cookies:
Drop rounded tablespoons of dough onto ungreased baking sheets. Leave about 2 inches between cookies, as they will spread slightly. If you prefer a smoother cookie, you can gently flatten the tops with the palm of your hand or the bottom of a glass.
3.
Bake and Cool:
Bake for 8-10 minutes, or until the edges are lightly golden and the centers are still slightly soft. The cookies will continue to set as they cool. Let them cool on the baking sheets for a few minutes before transferring them to a wire rack to cool completely. These cookies are best enjoyed the day they are made but will stay soft in an airtight container for a couple of days.
Coconut Macaroon Nests
These adorable little nests are inspired by the classic coconut macaroon and are perfect for holding little candy “eggs.”
Ingredients:
Cooking Instructions:
1.
Prepare the Macaroon Mixture:
Preheat your oven to 325°F (160°C). Line baking sheets with parchment paper. In a medium bowl, combine the sweetened condensed milk, shredded coconut, and vanilla extract. Stir until the coconut is evenly moistened. The mixture should be sticky.
2.
Form the Nests:
Using a spoon, scoop portions of the coconut mixture onto the prepared baking sheets. With a second spoon or your fingers, gently shape each portion into a small nest or cup shape, creating a slight indentation in the center. You want them to be rustic and charming, not perfectly uniform. Leave about 1 inch of space between each nest.
3.
Bake the Nests:
Bake for 12-15 minutes, or until the edges are golden brown and the centers are set. Keep a close eye on them as coconut can brown quickly. Remove from the oven and let the nests cool on the baking sheets for a few minutes before carefully transferring them to a wire rack to cool completely.
4.
Fill with Candy Eggs:
Once the coconut macaroon nests are completely cool, gently place mini chocolate eggs or jelly beans into the indentations to resemble little Easter eggs nestled in a bird’s nest. These are best assembled just before serving to keep the candy from melting or becoming sticky.
Carrot Strawberries
This is a wonderfully simple and creative idea that’s more of a fun assembly project for kids than a complex recipe.
Ingredients:
Cooking Instructions:
1.
Prepare the Strawberries:
Wash and thoroughly dry the strawberries. It’s crucial that they are completely dry, or the candy melts won’t adhere properly. Remove the green leafy tops.
2.
Melt the “Carrot” Coating:
In a microwave-safe bowl, melt the orange candy melts or white chocolate chips according to package directions. Stir until smooth. If using white chocolate chips, stir in a small amount of orange candy coloring until you achieve a vibrant carrot orange.
3.
Coat the Strawberries:
Dip each strawberry into the melted orange coating, leaving the top portion uncovered. Allow any excess candy to drip off. Place the coated strawberries on a parchment-lined baking sheet.
4.
Add the “Tops”:
Melt the green candy melts or use green sprinkles. If using green candy melts, dip a toothpick into the melted candy and carefully create small “leafy” tops on the uncovered portion of the strawberries. If using green sprinkles, sprinkle them onto the wet orange coating before it sets.
5.
Set and Serve:
Place the baking sheet in the refrigerator for about 10-15 minutes, or until the candy coating is firm. These are a delightful and healthy-ish treat that kids will love to help make and eat.
This collection offers a variety of flavors and skill levels, ensuring that every Easter celebration is filled with delicious homemade goodness. Happy baking!
Conclusion:
I hope you’re feeling inspired to whip up some delicious treats with these 17 Easy Easter Dessert Recipes! We’ve covered everything from adorable bunny-themed cupcakes perfect for little hands to impressive cakes and pies that will wow your Easter gathering. These recipes are designed for simplicity, ensuring that even begin extractner bakers can create stunning and crowd-pleasing desserts. Don’t be afraid to get creative with your decorations; a sprinkle of colorful candy eggs or a dusting of edible glitter can truly elevate your creations.
Whether you’re planning an intimate family brunch or a larger Easter party, there’s a recipe here to suit every need. Many of these desserts can be made ahead of time, freeing you up to enjoy the festivities. Consider pairing a light and fruity dessert with a richer chocolate option for a balanced dessert spread. Remember, the most important ingredient is the love and joy you put into making them. So gather your ingredients, put on some festive music, and have fun baking these delightful Easter treats! I encourage you to try at least one, or even a few, of these fantastic ideas!
Frequently Asked Questions:
Can I make these desserts ahead of time?
Yes, absolutely! Many of these 17 Easy Easter Dessert Recipes are perfect for making a day or two in advance. Cakes, cookies, and no-bake options often taste even better when the flavors have had a chance to meld. Simply store them properly according to individual recipe instructions, and they’ll be ready to impress on Easter.
What if I have dietary restrictions?
While these recipes are generally crowd-pleasing, you can often adapt them. For example, many cake and cookie recipes can be made gluten-free by using a good quality gluten-free flour blend. Dairy-free substitutions are also usually possible for butter and milk. It’s always a good idea to check individual ingredient substitutions and test them if you’re unsure.
How can I make the decorations more engagin extractg for kids?
Let the kids get involved! Provide them with a variety of colorful frostings, sprinkles, edible glitter, mini chocolate chips, and candy eggs. They can help pipe frosting onto cupcakes, arrange candy decorations on cookies, or even create their own edible Easter scenes. It’s a fun and memorable way to involve them in the baking process.
17 Easy Easter Dessert Recipes
A collection of 17 delightful and easy Easter dessert recipes, perfect for baking with kids or serving to a crowd. Features a variety of sweet treats, from classic cakes to fun cookies and no-bake options.
Ingredients
-
Cream cheese
-
Sugar
-
Eggs
-
Lemon zest
-
Vanilla extract
-
Graham cracker crumbs
-
Butter
-
Shredded coconut
-
Powdered sugar
-
Flour
-
Sprinkles
-
Carrots
-
Strawberries
Instructions
-
Step 1
Prepare the base for the Lemon Cheesecake by mixing graham cracker crumbs with melted butter and pressing into a pie plate. -
Step 2
Beat cream cheese and sugar until smooth for the cheesecake filling. -
Step 3
Incorporate eggs one at a time, followed by lemon zest and vanilla extract, mixing well. -
Step 4
Pour the cheesecake filling over the prepared crust and bake until set. -
Step 5
For the Easter Garden Cake, prepare your favorite cake batter and bake in a round pan. Decorate with green frosting and candy flowers. -
Step 6
Create Funfetti Cake Mix Cookies by combining cake mix with eggs and oil. Stir in sprinkles and drop spoonfuls onto a baking sheet. -
Step 7
Make Coconut Macaroon Nests by mixing shredded coconut, powdered sugar, and egg whites. Bake in mini muffin tins until golden. -
Step 8
Assemble Carrot Strawberries by hollowing out strawberries and filling them with a cream cheese mixture, resembling tiny carrots.
Important Information
Nutrition Facts (Per Serving)
It is important to consider this information as approximate and not to use it as definitive health advice.
Allergy Information
Please check ingredients for potential allergens and consult a health professional if in doubt.