Classic Banana Pudding Recipe-Easy Delicious Dessert
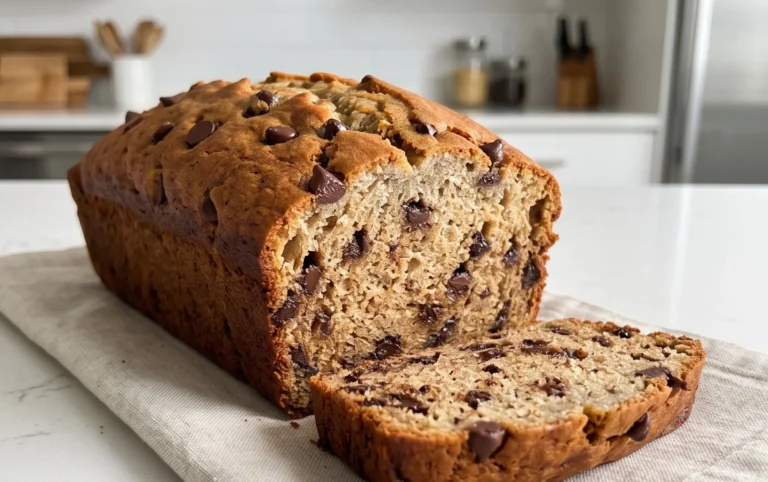
Banana Pudding is more than just a dessert; it’s a warm hug in a bowl, a nostalgic trip back to childhood kitchens, and a guaranteed crowd-pleaser at any gathering. There’s something inherently comforting and satisfying about the creamy layers of vanilla custard, tender banana slices, and crunchy vanilla wafers that make this classic so universally loved. It’s a dessert that evokes smiles, sparks happy memories, and always leaves people asking for seconds. What truly makes our Banana Pudding recipe special is the perfect balance of textures and flavors – it’s rich without being heavy, sweet without being cloying, and the delicate vanilla notes sing in harmony with the natural sweetness of the ripe bananas. This isn’t just any Banana Pudding; it’s an elevated version that’s surprisingly simple to make yet delivers an unforgettable taste experience, perfect for mastering whether you’re a seasoned baker or just starting your culinary journey.
Ingredients:
- 1 (3.4 oz) box instant vanilla pudding mix
- 2 cups cold milk
- 1 (14 oz) can sweetened condensed milk
- 1 teaspoon vanilla extract
- 1 (8 oz) tub whipped topping, thawed
- 4-5 ripe bananas, sliced
- 1 (11 oz) box vanilla wafers
Preparing the Pudding Base
Step 1: Combine Pudding Mix and Milk
This is where the magic starts to happen for our creamy Banana Pudding. Grab a medium-sized mixing bowl. Pour in the entire contents of the 1 (3.4 oz) box of instant vanilla pudding mix. To this, add 2 cups of cold milk. It’s crucial that the milk is cold, as this helps the pudding to thicken properly and achieve that perfect consistency. Do not use warm or room temperature milk for this step. Using cold milk ensures a smooth, lump-free base.
Step 2: Whisk Until Thickened
Now, take a whisk and begin extract mixing the pudding mix and milk vigorously. You’ll want to whisk for about 2 minutes, or until the mixture starts to thicken. You’ll notice it becoming noticeably thicker almost immediately. Keep whisking to ensure there are no dry pockets of pudding mix remaining at the bottom of the bowl. The goal is a smooth, well-combined, and semi-thick pudding. Don’t overmix to the point of developing gluten, as that’s not an issue with instant pudding, but ensure thorough incorporation. Once it has thickened to your liking, set it aside for a moment.
Step 3: Incorporate Sweetened Condensed Milk and Vanilla Extract
Next, we’re going to enrich our pudding base. To the thickened pudding mixture, pour in the entire 1 (14 oz) can of sweetened condensed milk. This is what gives our Banana Pudding its wonderfully rich and decadent sweetness, moving beyond the basic sweetness of the instant mix. Follow this by adding 1 teaspoon of vanilla extract. This enhances the vanilla flavor and adds another layer of aromatic depth to the dessert.
Step 4: Gently Fold in Whipped Topping
Now it’s time to lighten things up and make our pudding incredibly fluffy. Take your 1 (8 oz) tub of thawed whipped topping. It’s important that the whipped topping is fully thawed, but not melted into a liquid. Add the thawed whipped topping to the pudding mixture. Using a spatula or a large spoon, gently fold the whipped topping into the pudding. You want to incorporate it without deflating the airiness of the whipped topping. Continue folding until no streaks of white whipped topping remain and the mixture is uniformly combined and has a light, airy texture. Avoid overmixing, as this can make the pudding less fluffy. The mixture should be smooth and creamy.
Assembling the Banana Pudding
Step 5: Layering the Dessert
Now comes the fun part: assembling our delicious Banana Pudding! Grab a serving dish. A 9×13 inch baking dish or a trifle bowl works beautifully. Start by spreading a thin layer of the pudding mixture on the bottom of the dish. Next, arrange a single layer of sliced ripe bananas. The riper the bananas, the sweeter and more pronounced their flavor will be. Then, cover the banana layer with a single layer of vanilla wafers. You can break some of the wafers if needed to fill in gaps. Repeat these layers: pudding, bananas, vanilla wafers, until all your ingredients are used up, ending with a final layer of the creamy pudding mixture on top. Ensure your banana slices are evenly distributed for flavor in every bite.
Chilling and Serving
Once your Banana Pudding is assembled, cover the dish tightly with plastic wrap. This prevents a skin from forming on the top of the pudding. Refrigerate for at least 2 to 4 hours. This chilling time is crucial. It allows the flavors to meld together, the vanilla wafers to soften slightly and absorb some of the pudding’s moisture, and the entire dessert to set properly. The longer it chills, the better the flavors will develop. For an even more enjoyable experience, you can chill it overnight. When you’re ready to serve, you can add a few extra vanilla wafers or banana slices on top for decoration if you wish. Enjoy this classic, comforting dessert!
Conclusion:
You’ve now got the ultimate guide to creating a truly delightful Banana Pudding! This classic dessert is a crowd-pleaser for a reason, offering that perfect blend of creamy, sweet, and fruity goodness. We’ve covered the essential steps to achieve a smooth custard, perfectly ripe bananas, and those irresistible vanilla wafers. Don’t be intimidated by making the custard from scratch; it’s a rewarding process that elevates your Banana Pudding from good to unforgettable.
When it comes to serving, this Banana Pudding shines on its own, but consider a sprinkle of toasted coconut or a dollop of whipped cream for an extra touch of elegance. For variations, feel free to experiment with different types of cookies like shortbread or even add a hint of cinnamon to your custard for a warmer flavor profile. The most important thing is to have fun and enjoy the process of creating this beloved dessert. We encourage you to give this recipe a try and share your delicious creations!
Frequently Asked Questions:
Can I make Banana Pudding ahead of time?
Yes, absolutely! Banana Pudding is often even better when made a few hours or even a day in advance. This allows the flavors to meld together beautifully, and the wafers to soften just enough. Just be sure to assemble it closer to serving time if you prefer a firmer wafer texture.
What kind of bananas should I use for Banana Pudding?
For the best flavor and texture, opt for ripe to slightly overripe bananas. They will be sweeter and softer, contributing more depth to your Banana Pudding. Avoid green or overly mushy bananas.
Classic Banana Pudding Recipe-Easy Delicious Dessert
A classic and easy-to-make banana pudding recipe that results in a delicious and comforting dessert, featuring layers of creamy pudding, ripe bananas, and vanilla wafers.
Ingredients
-
1 (3.4 oz) box instant vanilla pudding mix
-
2 cups cold milk
-
1 (14 oz) can sweetened condensed milk
-
1 teaspoon vanilla extract
-
1 (8 oz) tub whipped topping, thawed
-
4-5 ripe bananas, sliced
-
1 (11 oz) box vanilla wafers
Instructions
-
Step 1
In a medium mixing bowl, combine the instant vanilla pudding mix and cold milk. Whisk vigorously for about 2 minutes until the mixture thickens and is smooth. -
Step 2
To the thickened pudding mixture, add the sweetened condensed milk and vanilla extract. Stir well to incorporate. -
Step 3
Gently fold in the thawed whipped topping using a spatula until the mixture is uniform and has a light, airy texture. Avoid overmixing. -
Step 4
Begin assembling the pudding in a serving dish (like a 9×13 inch baking dish or trifle bowl). Spread a thin layer of the pudding mixture on the bottom. -
Step 5
Arrange a single layer of sliced ripe bananas over the pudding. Then, cover the bananas with a layer of vanilla wafers, breaking them to fill gaps if needed. -
Step 6
Repeat the layering process (pudding, bananas, vanilla wafers) until all ingredients are used, ending with a final layer of pudding on top. -
Step 7
Cover the dish tightly with plastic wrap and refrigerate for at least 2 to 4 hours, or preferably overnight, to allow flavors to meld and the dessert to set.
Important Information
Nutrition Facts (Per Serving)
It is important to consider this information as approximate and not to use it as definitive health advice.
Allergy Information
Please check ingredients for potential allergens and consult a health professional if in doubt.